Docs
Events
One of our core principles is to make data actionable. This is made possible by a set of powerful functionalities of the platform: event triggers, events and notifications. In short, event triggers are used to define rules on a metric that eventually will lead to an event and possible notifications.
Using event triggers
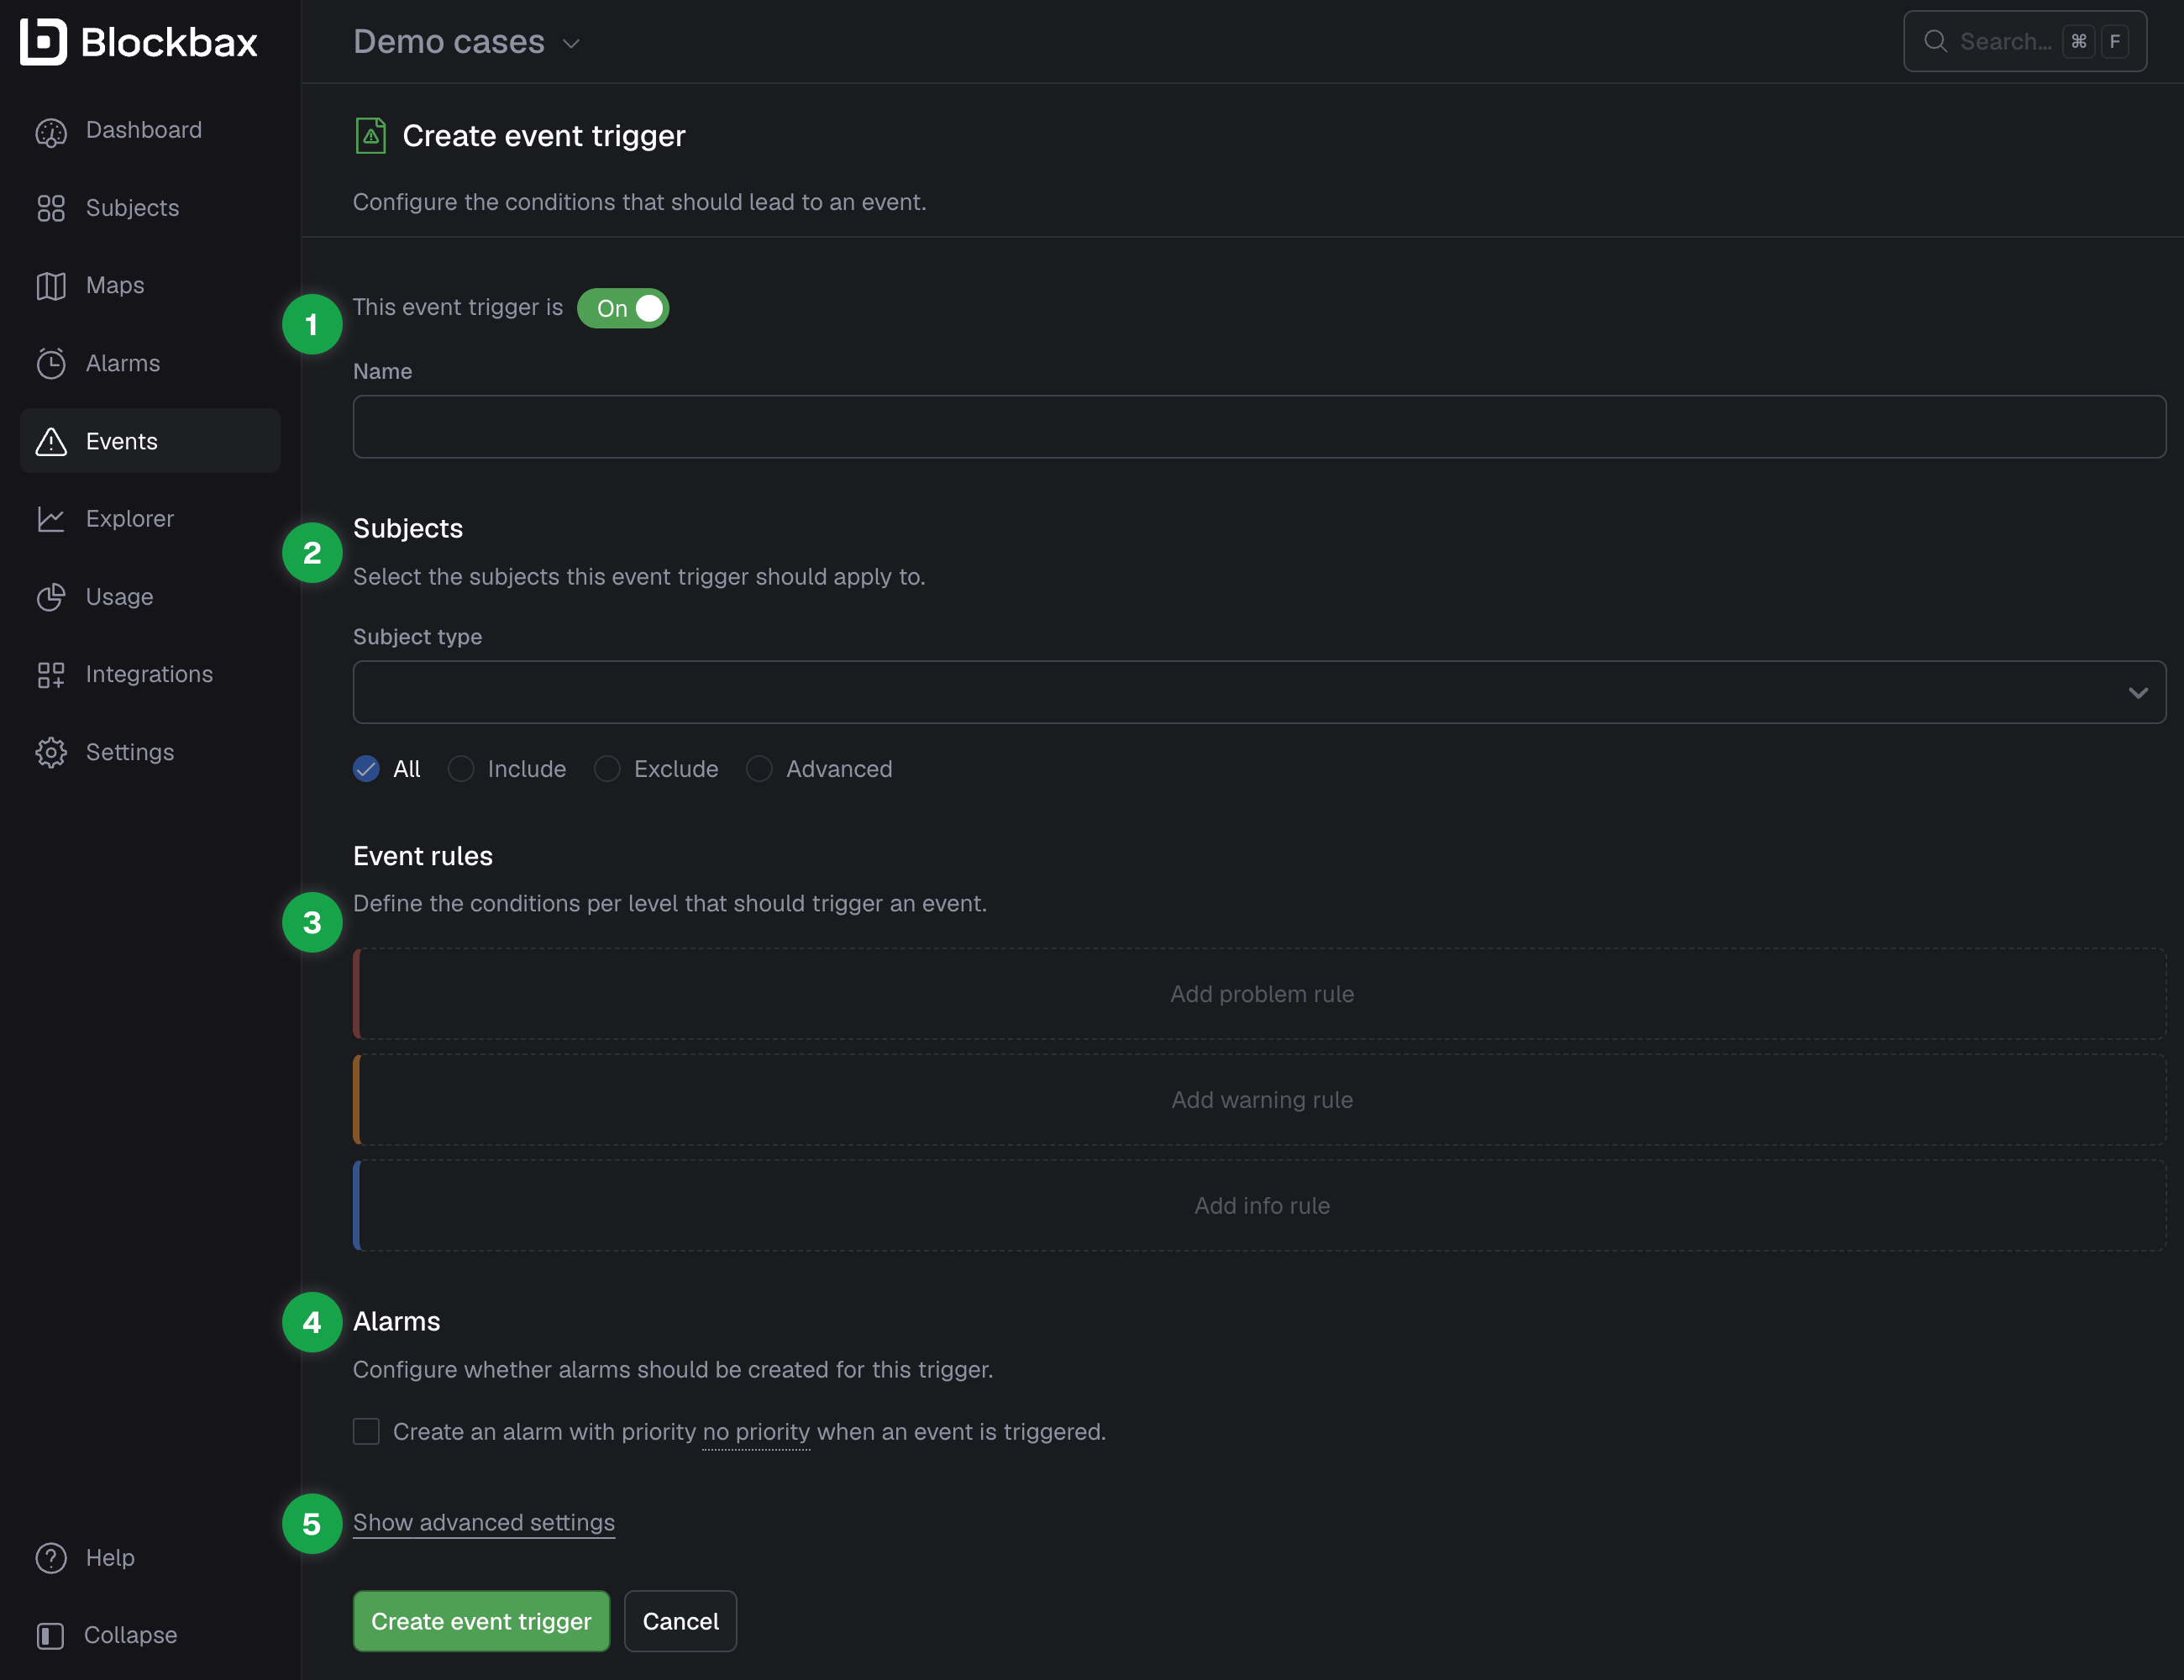
Event triggers are used to configure your business rules on metrics. The configuration of a trigger is of crucial importance since this will lead to events that you and/or a system will act on. Make sure you activate the trigger and give it a recognizable name (1), select the subjects the event trigger applies to (2), define the conditions per level that should trigger an event (3), configure whether alarms should be created for this trigger (4) and consider whether you need one of the advanced options (5).
Managing event triggers
Event triggers and their rules have a lot of options to make it useful in many circumstances. Here you find the actions and configuration information for creating or updating an event trigger.
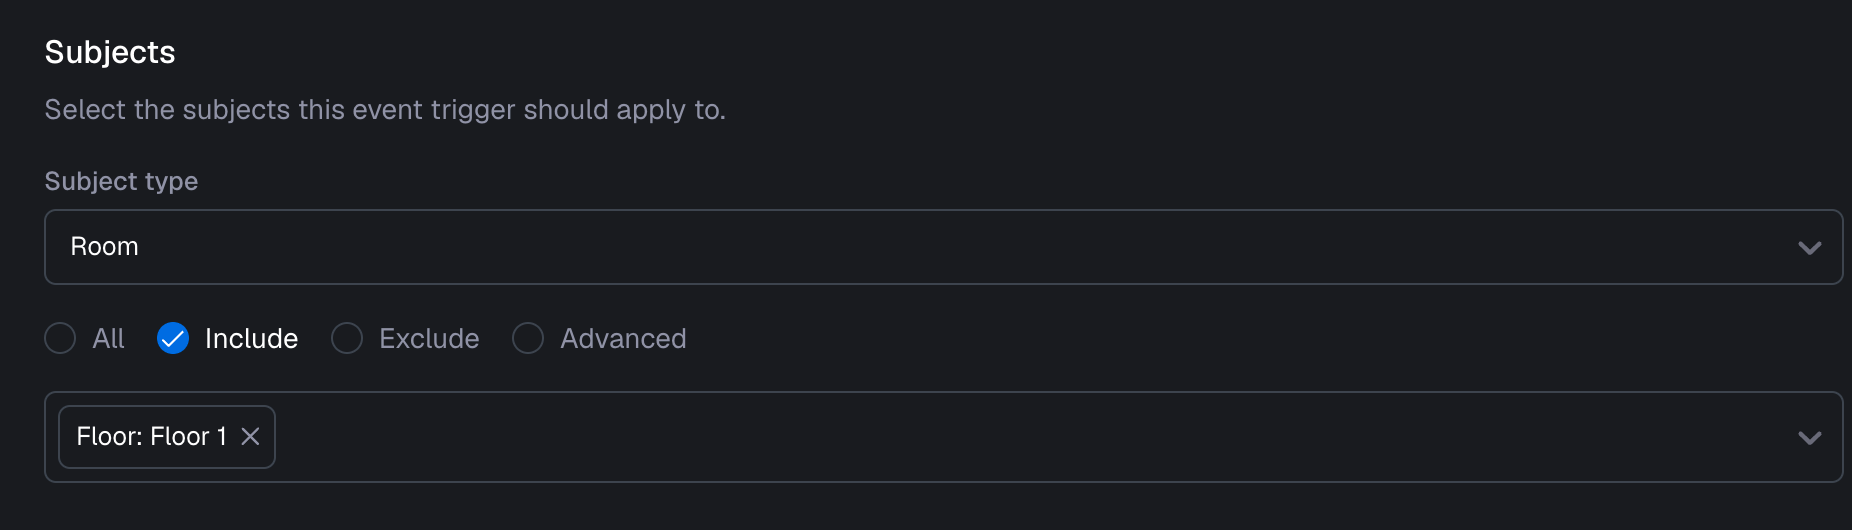
Choosing subjects
Select the subject type and specific subjects the event trigger applies to.
Include and exclude subjects based on properties
The behavior of including and excluding subjects based on a property differs from selecting individual subjects.
| One or more properties | Result |
|---|---|
| Include | The trigger applies to the subjects that match all properties |
| Exclude | The trigger does not apply to subjects that match one of the selected properties |
Configuring event rules
The no-code configuration of an event rule gives a lot of opportunities and is very powerful.
Levels
You can see the levels of priority when configuring the rules of a trigger. Just so you know, you do not need to set every level. For example, a metric can move from Problem to OK, depending on how you configured the rules. Here is the information about the levels:
| Status | Priority | Color |
|---|---|---|
| Problem | High | Red |
| Warning | Medium | Orange |
| Info | Low | Blue |
| OK | (no action needed) | Green |
Levels can be combined with the statement AND or with the statement OR. Just add another rule or condition to see the AND/OR functionality appear.
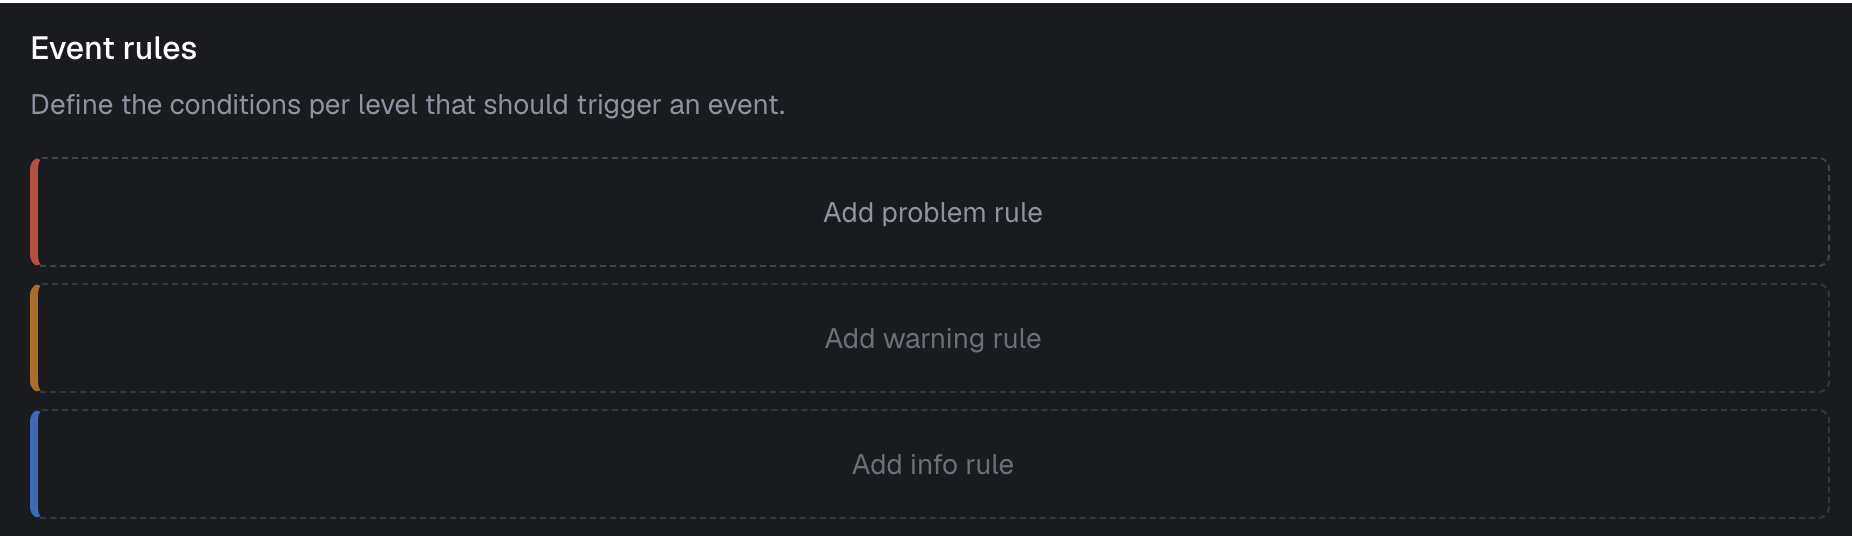
Below you can see the banners to click on to start adding event rules.
Conditions
You can add problem, warning and info rules with one or more conditions. The platform allows you to combine rules and conditions that lead to many configuration possibilities. Let’s dive deeper to give you a good understanding of these possibilities.
Condition types
| Condition type | Description |
|---|---|
| Threshold | A threshold condition evaluates two or three inputs based on a function |
| Change | A change condition evaluates the difference between two inputs |
| Text match | A text match condition evaluates two text inputs |
| Geofence condition | A geofence condition evaluates certain conditions between two location inputs |
Condition inputs
| Input | Description |
|---|---|
| Metric | The metric of a subject |
| Property | The property value of a subject |
| Static value | A positive or negative numerical value, a text value or a location or area value |
Down here you see the available condition inputs in the selector.
Metric aggregation function and period
A metric input in either a threshold or change condition can hold an aggregation. Next to the most recent value you can use the aggregation functions:
- Average
- Minimum
- Maximum
- Sum of values
- Number of measurements
Over a time period of:
- Seconds
- Minutes
- Hours
- Days
- Weeks
- Aggregations are calculated relative to the time of the latest measurement in scope of an event trigger and are updated every time newer measurements are processed (so they are moving averages, minimums etc.).
- Triggers are backfilled with data upon receiving the first measurement after creating the trigger. This means that when you have selected '1 day' as aggregation period, you don't have to wait one day before the triggers are evaluated.
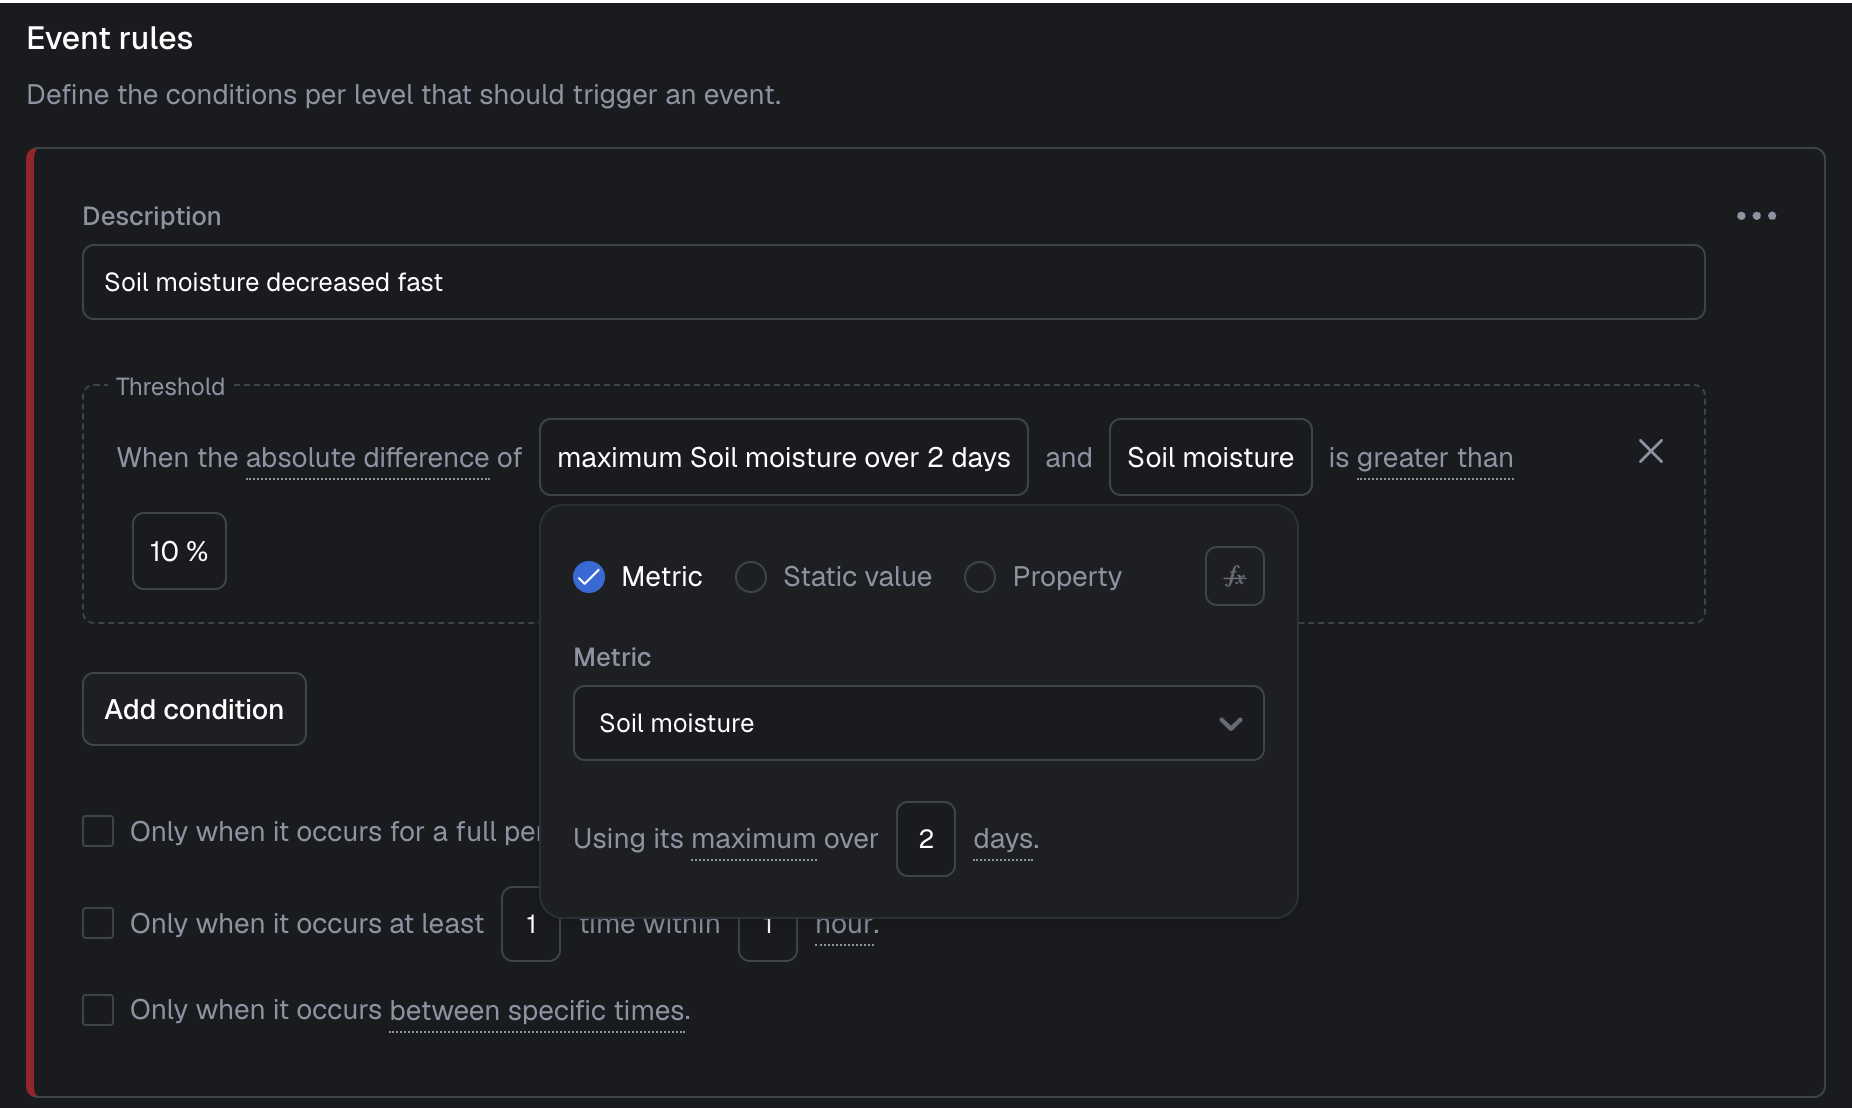
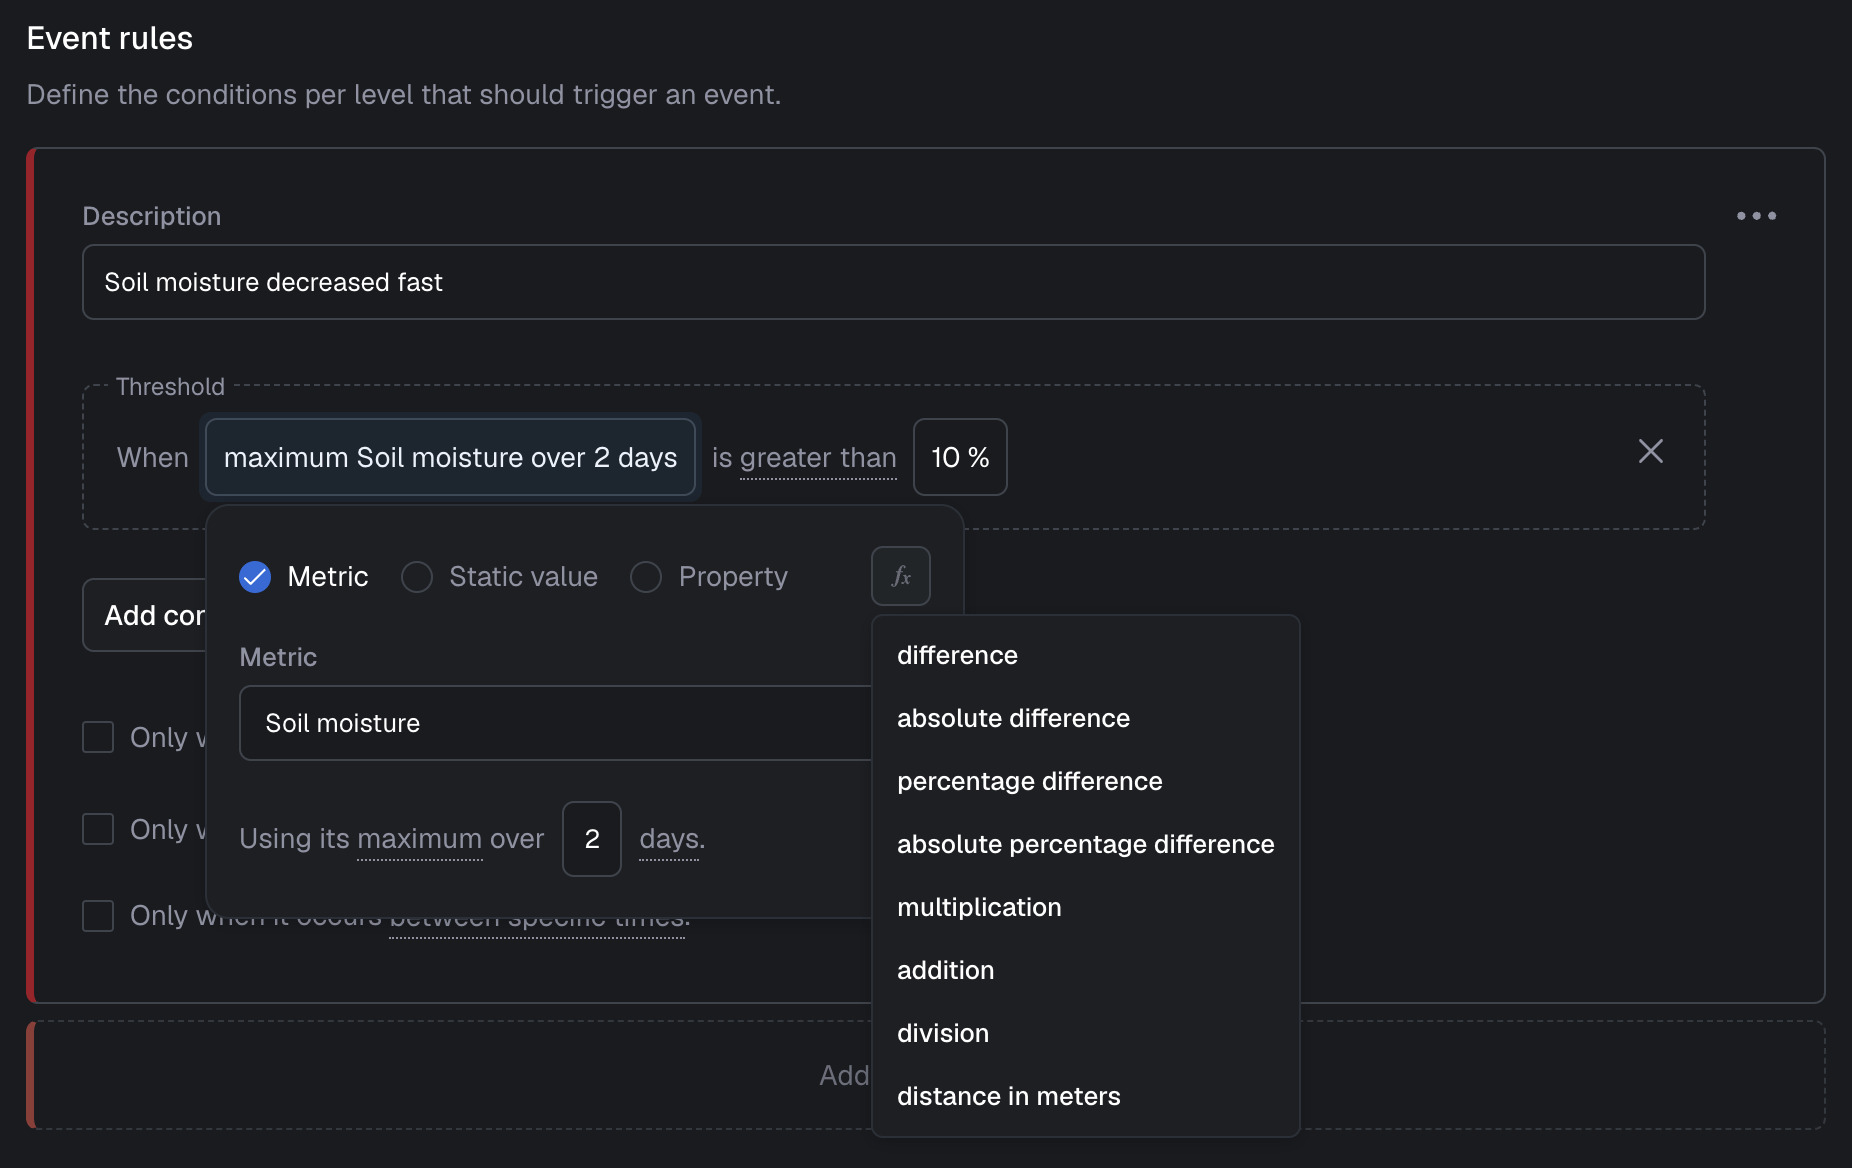
In this image a selector where a threshold condition is configured with an aggregation is shown:
Condition calculations
You can use functions that will behave like operators in a calculation. The available functions differ per type of condition as stated in the table below.
| Function | Example | Threshold condition | Change condition |
|---|---|---|---|
| Difference | 5-20 = -15 | Yes | Yes |
| Absolute difference | 5-20 = 15 | Yes | Yes |
| Percentage difference | (15-20)/20*100 = -25% | Yes | Yes |
| Absolute percentage difference | (15-20)/20*100 = 25% | Yes | Yes |
| Multiplication | 20 * 15 = 300 | Yes | No |
| Division | 20 / 15 = 1.33 | Yes | No |
| Addition | 20 + 15 = 35 | Yes | No |
Down here you see the possible functions in the selector of a threshold condition.
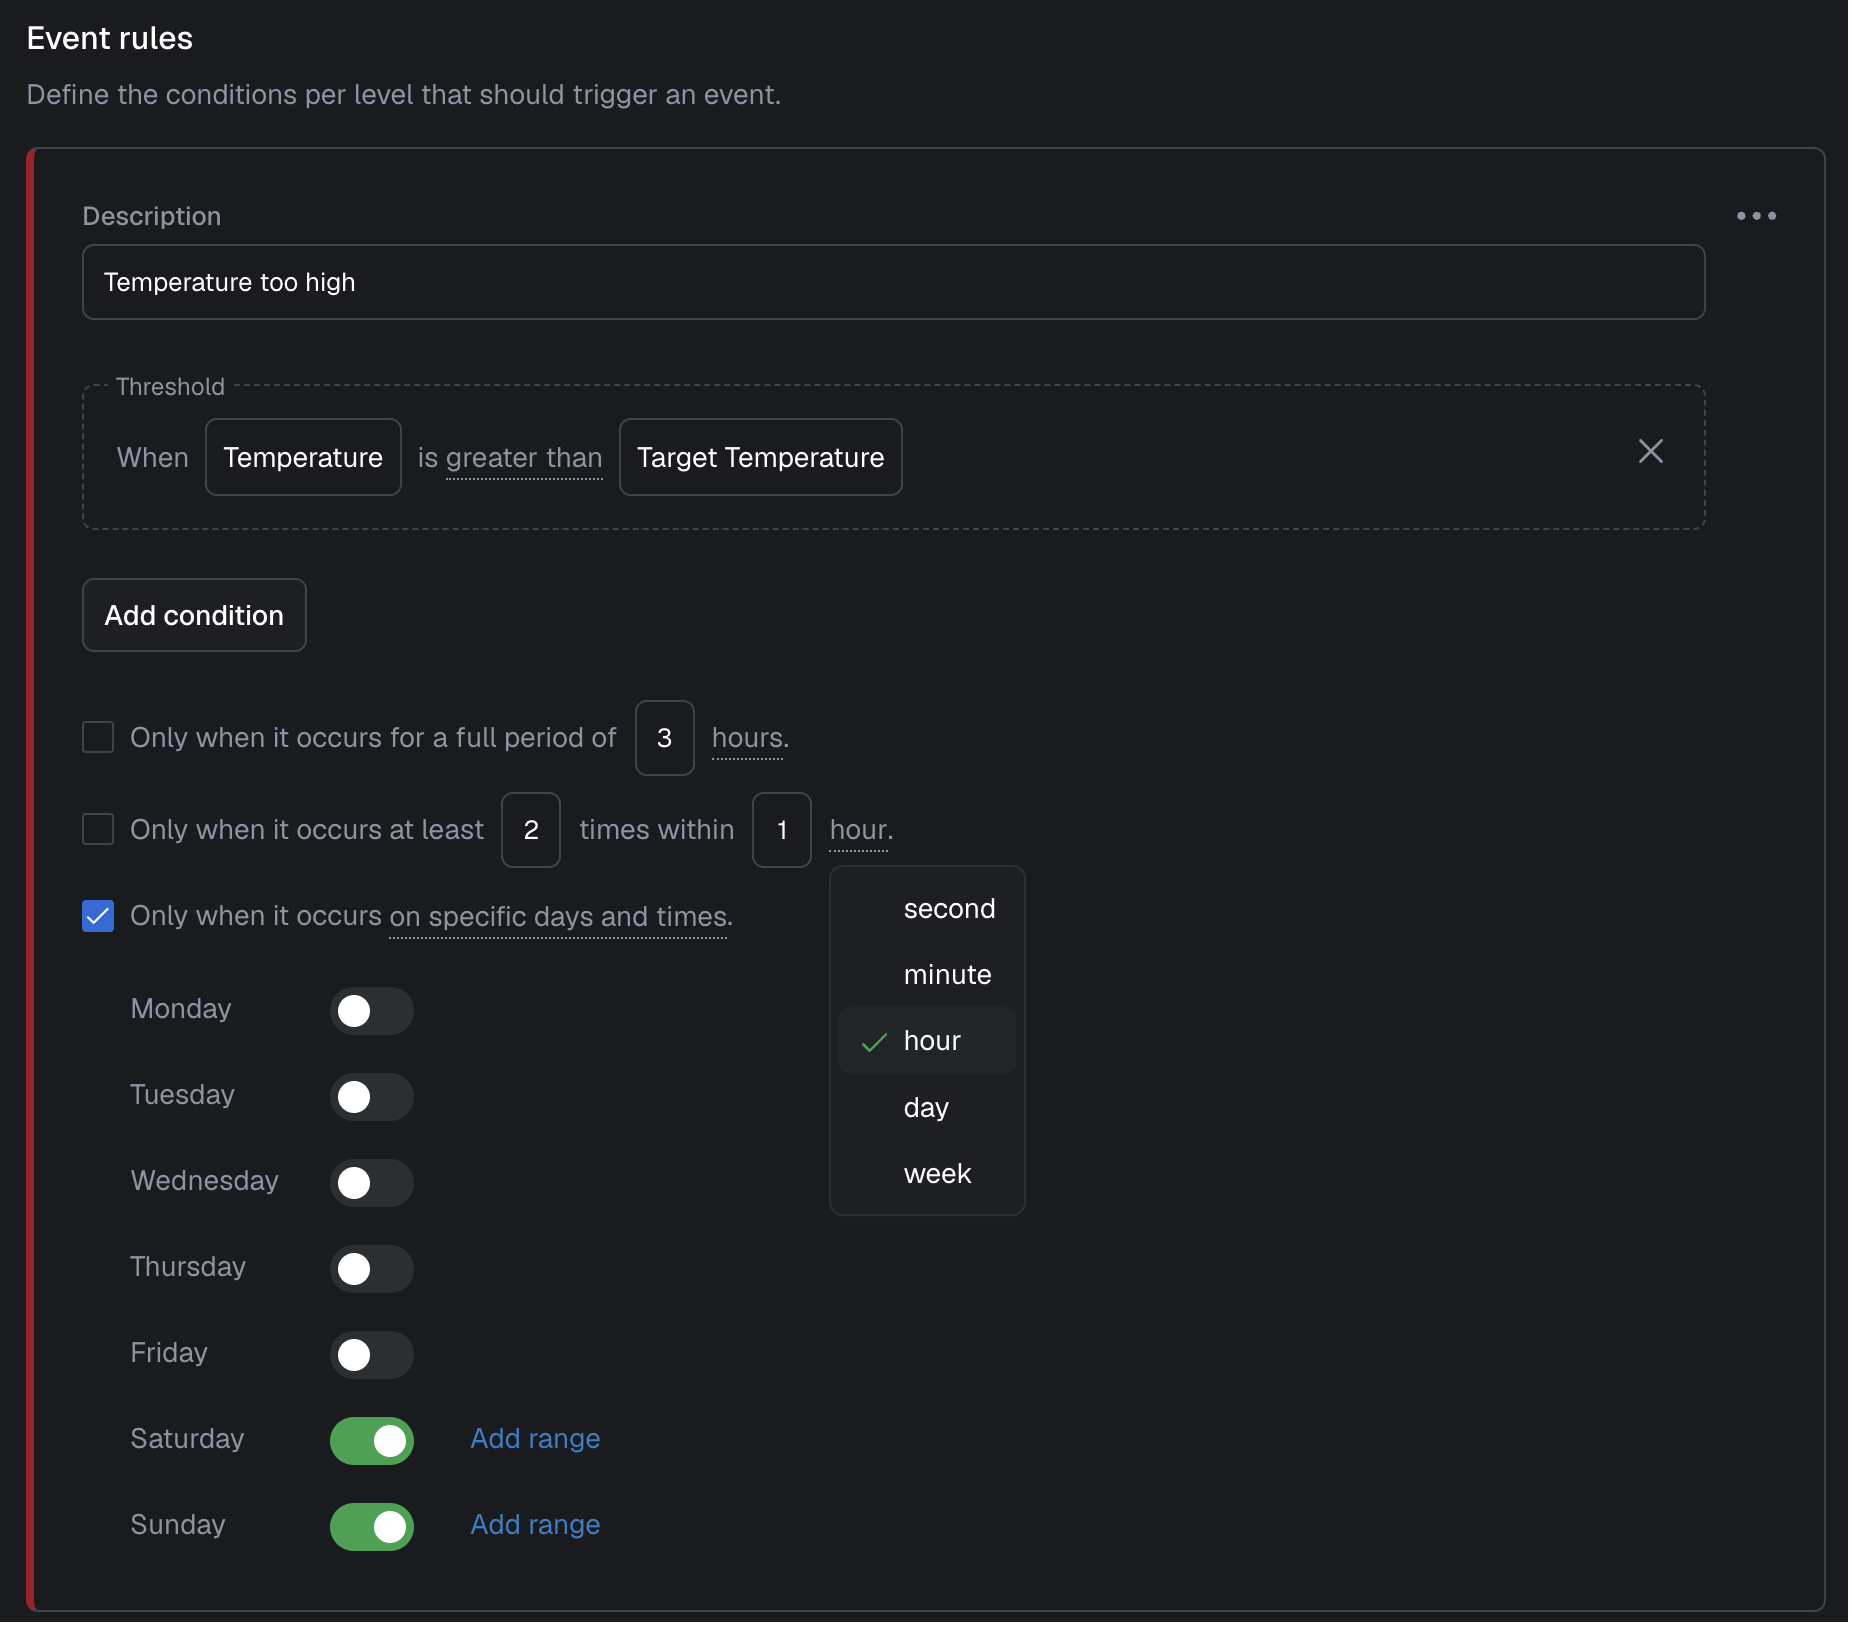
Constraints
An event rule can have one or more occurrence and/or time constraints. The possibilities speak for themselves when you see the screenshot below.
| Constraint | Format | Example |
|---|---|---|
| Within a time frame | Trigger only when it occurs for at least X consecutive hours | You only want an event when the temperature is 25 degrees for a longer time |
| Occurrence and within time frame | Trigger only when it occurs at least X times within X hours | You only want an event when the electricity peaks occur several times within a time frame |
| Specific days and times | Trigger only when it occurs on specific days and times | You want to have this event only during working hours |
Here you see an example for a configuration in the webapp.
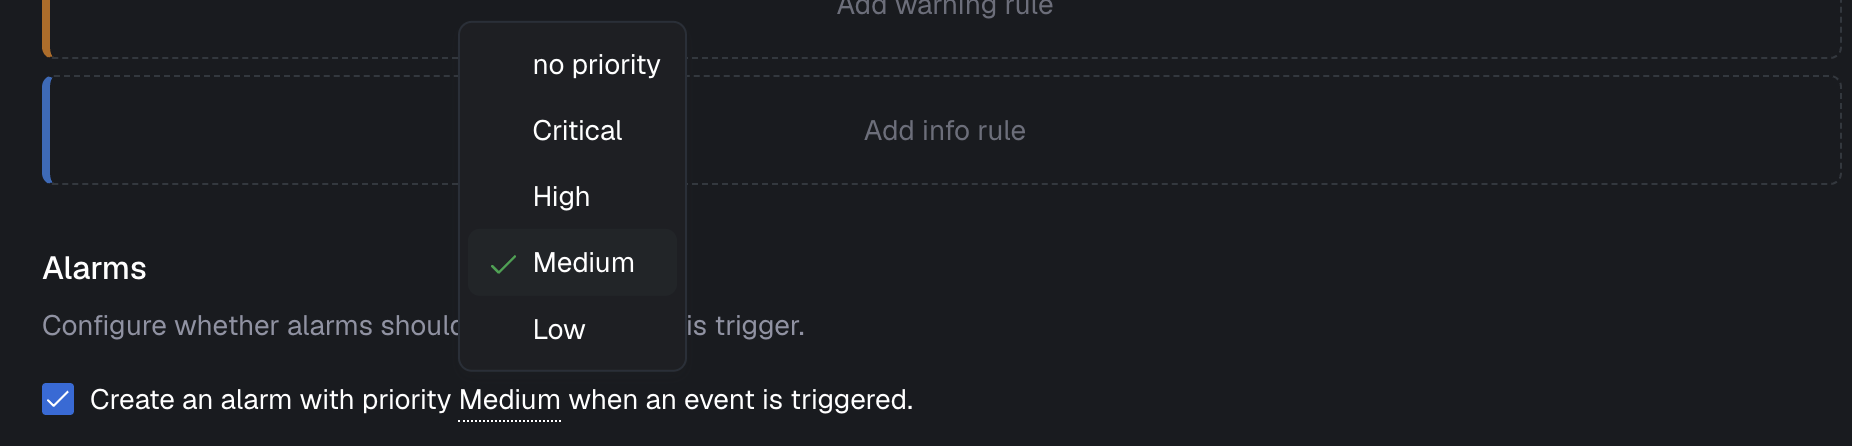
Alarms
Events can optionally lead to the creation of an alarm. In the Alarms section, you can configure whether you want alarms to be created for this event trigger. You can also specify the initial priority for the alarm. See alarms for more information about alarms.
Advanced settings
When you click ‘Show advanced settings’, you can configure advanced timing settings, as shown below.
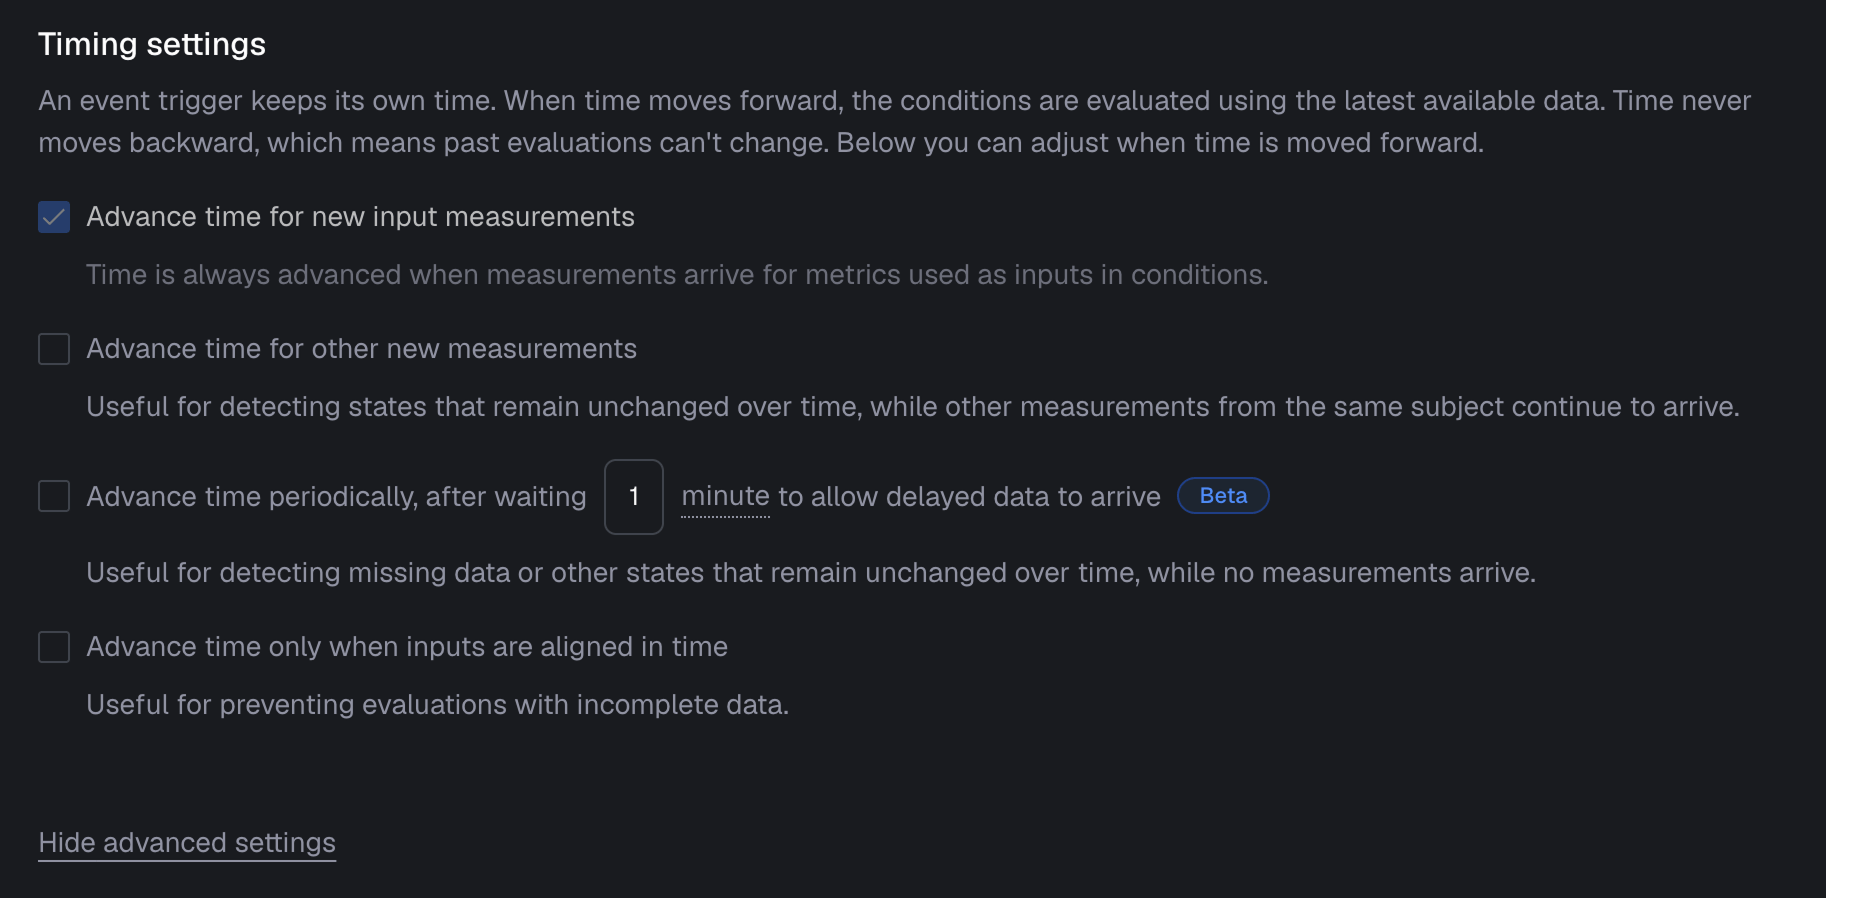
Understanding how time works in the context of event triggers — and measurements in general — is fundamental to using event triggers correctly. Before configuring advanced timing settings, we strongly recommend reading the general explanation of measurement time. In this section, we explain how time behaves specifically for event triggers and how the advanced settings allow you to influence that behavior.
An event trigger maintains its own internal notion of time. As time moves forward, trigger conditions are evaluated using the latest available data. Time never moves backward, meaning that once an evaluation has occurred, it cannot be changed retroactively. The timing settings below control when and under which circumstances time is advanced.
| Timing setting | Description |
|---|---|
| Advance time for new input measurements | Time is advanced when measurements arrive for metrics that are used as inputs in conditions. This setting is enabled by default and cannot be disabled. It is suitable for most common scenarios (see example 1). |
| Advance time for other new measurements | Time is also advanced when other measurements from the same subject arrive, even if they are not used as inputs. For performance reasons, time is advanced at most once per minute for these measurements. This setting is useful for detecting states that remain unchanged over time (see example 3). |
| Advance time periodically | Time is also advanced periodically when no measurements arrive at all. For performance reasons, time is advanced at most once per five minutes. A delay can be defined to set a grace period for delayed measurements to arrive. This setting is useful for detecting states that remain unchanged over time without measurements coming in (see example 4). |
| Advance time only when inputs are aligned in time | Time is advanced only when all input metrics have a measurement for exactly the same timestamp. This can be used to prevent evaluations based on incomplete data (see example 2). |
To clarify these settings in more detail, consider the following four examples.
Example 1: Typical scenario
Consider a scenario where an event trigger is configured with a rule that triggers an error when the pressure exceeds 400 kPa and a valve is closed. By default, time is advanced whenever measurements arrive for metrics used as inputs in the conditions. Using only the default settings, the table below shows how the event trigger is evaluated for each incoming batch of measurements for a specific subject.
| # | Incoming measurement batch | Event trigger evaluation |
|---|---|---|
| 1 | 2026-01-01, 09:05 - pressure 425 kPa and valve closed | Error event triggered at 9:05 |
| 2 | 2026-01-01, 09:10 - pressure 420 kPa and valve open | OK event triggered at 9:10 |
Example 2: Preventing evaluations with incomplete data
Now consider the same event trigger configuration, but assume that measurements are not sent in batches. Instead, they are sent individually. In that case, evaluations would occur as follows:
| # | Incoming measurement batch | Event trigger evaluation |
|---|---|---|
| 1 | 2026-01-01, 09:05 - pressure 425 kPa | No evaluation, valve has no value yet |
| 2 | 2026-01-01, 09:05 - valve closed | Error event triggered at 9:05 |
| 3 | 2026-01-01, 09:10 - pressure 420 kPa | Still evaluated as error at 9:10 (no change, so no event) |
| 4 | 2026-01-01, 09:10 - valve open | No evaluation, time does not advance because 9:10 is already evaluated |
In hindsight, the event trigger should transition to OK at 9:10, because the valve ultimately turned out to be open at that time. By enabling the setting ‘Advance time only when inputs are aligned in time’, you can prevent this situation by postponing evaluation until both pressure and valve state have a measurement for the same timestamp.
Example 3: Detect unchanged state for a certain period
Now consider a scenario where an event trigger is configured to trigger an error when a valve remains open for a period of 5 minutes. In this case, only the valve state is used as an input metric. By default, time would therefore advance only when valve measurements arrive.
However, to detect that the valve has remained open for a certain duration, we need time to continue advancing even when only other measurements for the subject arrive. This can be achieved by enabling ‘Advance time for other new measurements’. When this setting is enabled, the event trigger is evaluated as shown below.
| # | Incoming measurement batch | Event trigger evaluation |
|---|---|---|
| 1 | 2026-01-01, 09:05 - valve closed | OK event triggered at 9:05 |
| 2 | 2026-01-01, 09:10 - pressure 65 psi and valve open | Still evaluated as OK at 9:10 (no change, so no event) |
| 3 | 2026-01-01, 09:15 - pressure 59 psi | Error event triggered at 9:15 (valve is open for 5 minutes) |
| 4 | 2026-01-01, 09:20 - pressure 64 psi and valve closed | OK event triggered at 9:20 |
Example 4: Detect unchanged state for a certain period with periodic evaluation
Consider the scenario seen in the previous example. As stated, time needs to advance to detect unchanged states. With ‘Advance time periodically’ we can continue advancing time even when no new measurements arrive. When this setting is enabled, the event trigger is evaluated as shown below. This example uses no delay.
| # | Incoming measurement batch | Event trigger evaluation |
|---|---|---|
| 1 | 2026-01-01, 09:05 - valve closed | OK event triggered at 9:05 |
| 2 | 2026-01-01, 09:10 - pressure 65 psi and valve open | Still evaluated as OK at 9:10 (no change, so no event) |
| 3 | 2026-01-01, 09:15 - no measurements, but periodic evaluation is triggered | Error event triggered at 9:15 (valve is open for 5 minutes) |
| 4 | 2026-01-01, 09:20 - pressure 64 psi and valve closed | OK event triggered at 9:20 |
More examples
We’ve published a blog that gives more powerful examples of the possibilities of event triggers.
Editing and deleting event triggers
Removing an event trigger will have the following consequences:
- Associated events will be removed for all subjects.
- Dashboard panels using this event trigger need to be updated.
So, please be careful. This is where you can edit and delete an event trigger:
Using events
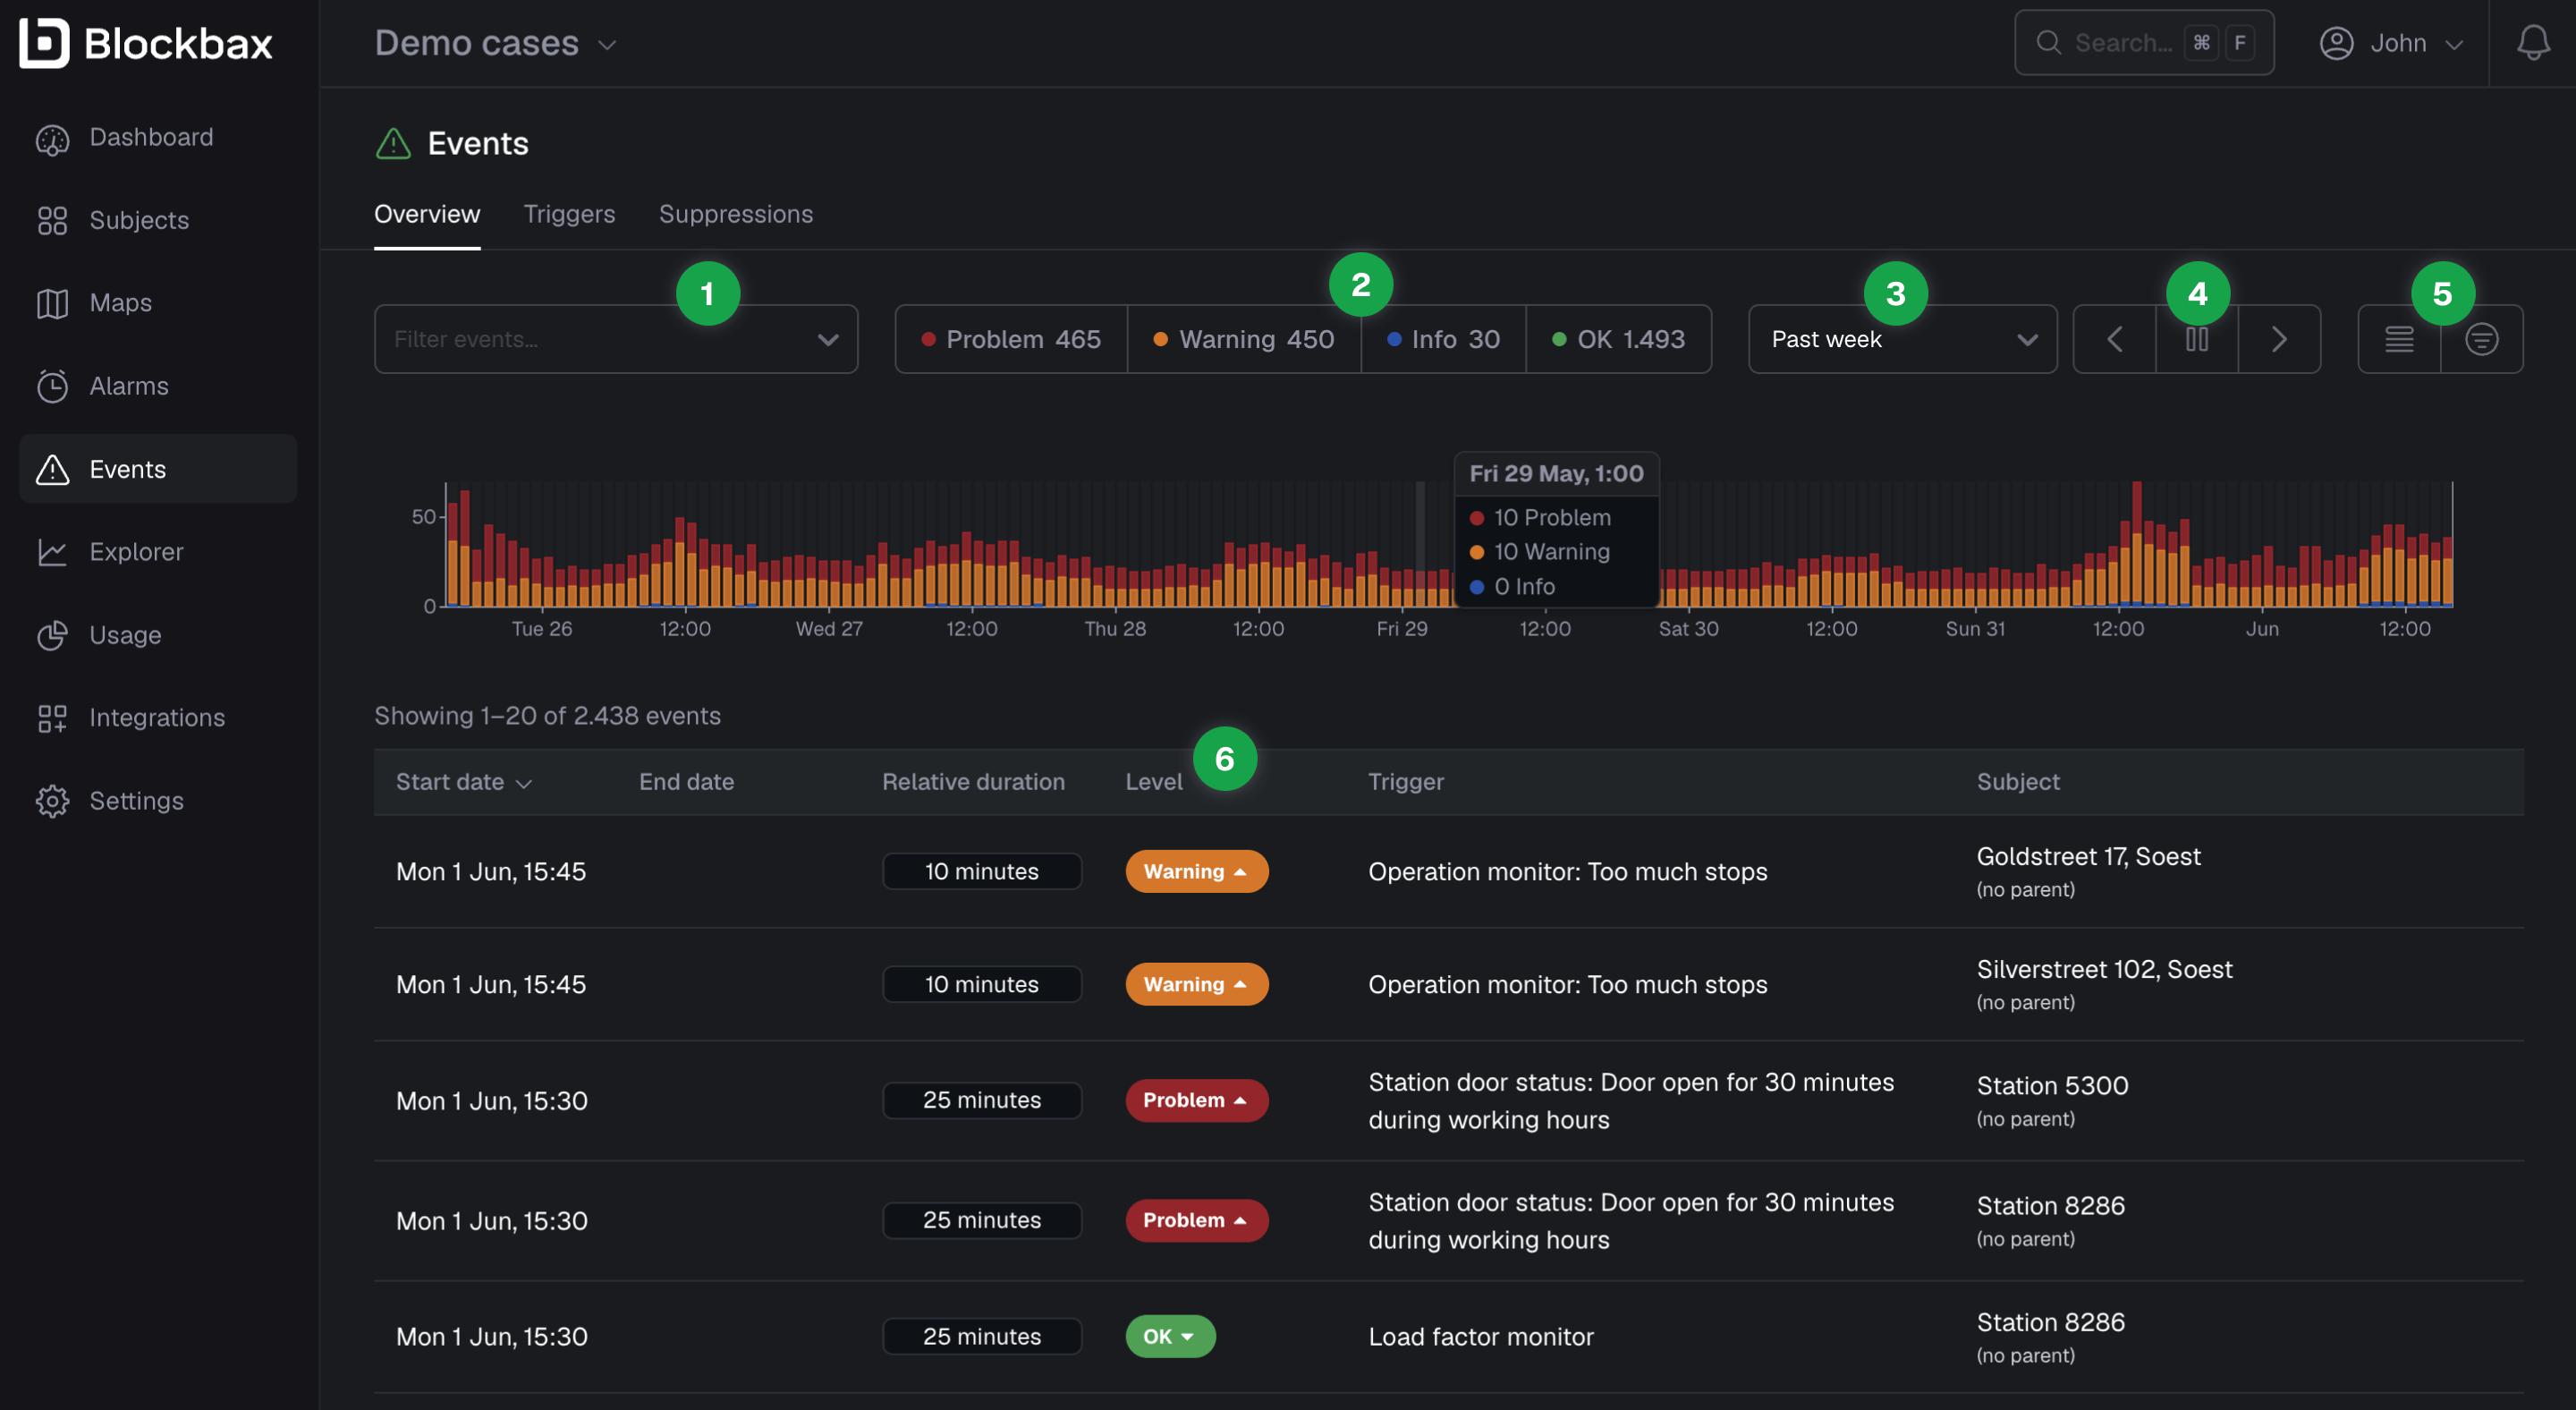
Events are your friend, because they help you to understand what is happening so you can take the action that is needed. In the events overview page, you can filter on subject, metrics, event triggers and properties (1), so you can make a cross-section of the events you like to see. In addition, you can filter on the status of an event (2) or within a certain time-window (3). You can use the arrows (4) to jump to different time-windows and the pause button (4) to (un)freeze your current stream of events. The first of the buttons (5) can be toggled to see grouped events and the second is to show active events. Grouped events are grouped by the number of times they occurred based on the selected period and active events are still running (red. events without end date) events. The list of events (6) is constrained on the filters you have applied.
Showing event details
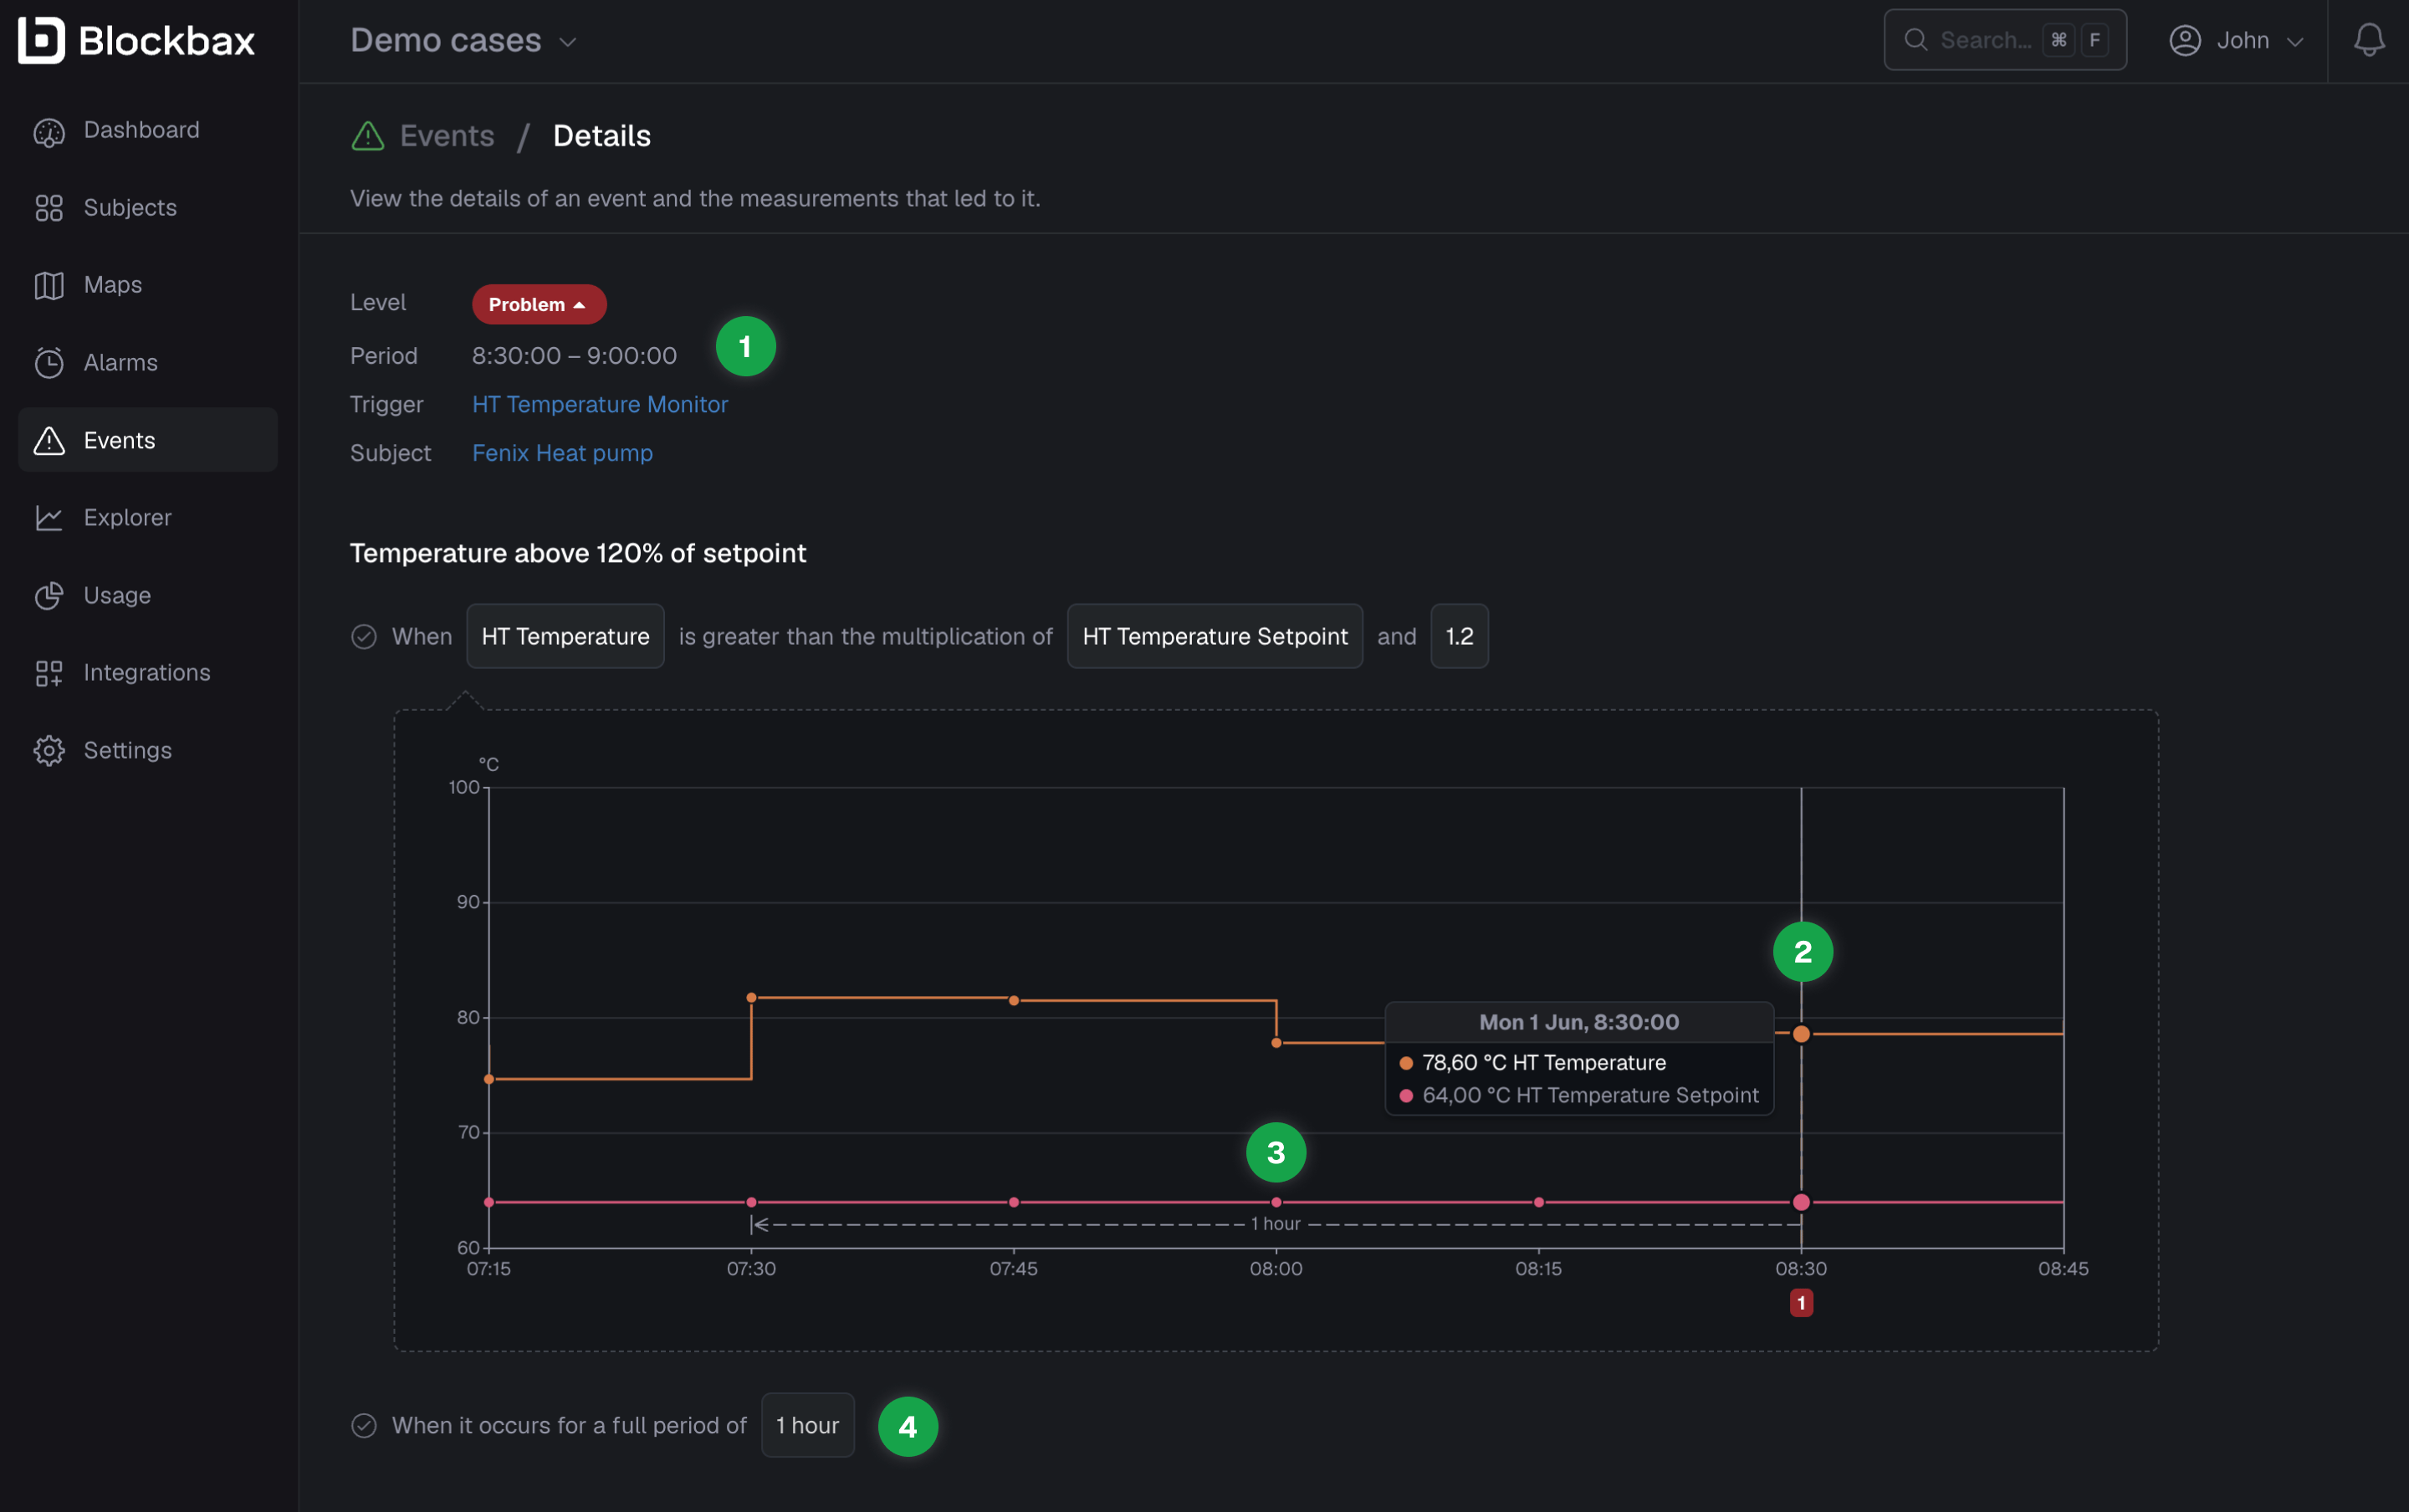
The event details are shown when clicking on one of the events in the overview page (see previous section). Here you can see some details (1) regarding the level, period and description. You can also hover over a point on the graph which will reveal a tooltip with additional information (2) about timing and values relevant for the trigger. If you have defined a time period in your trigger, such as a rule that must occur for over 1 hour, this will also be visually represented on the graph (3). Lastly, it is possible to configure multiple rules for an event to trigger, if there is more than one rule, occurrences or time constraints defined, you will be able to scroll down the page and visually inspect each rule that has been met (4).
Here you can see a user navigating through the events including zooming in on a particular event. Note that you can click and drag on the various charts to zoom in on a defined time period.
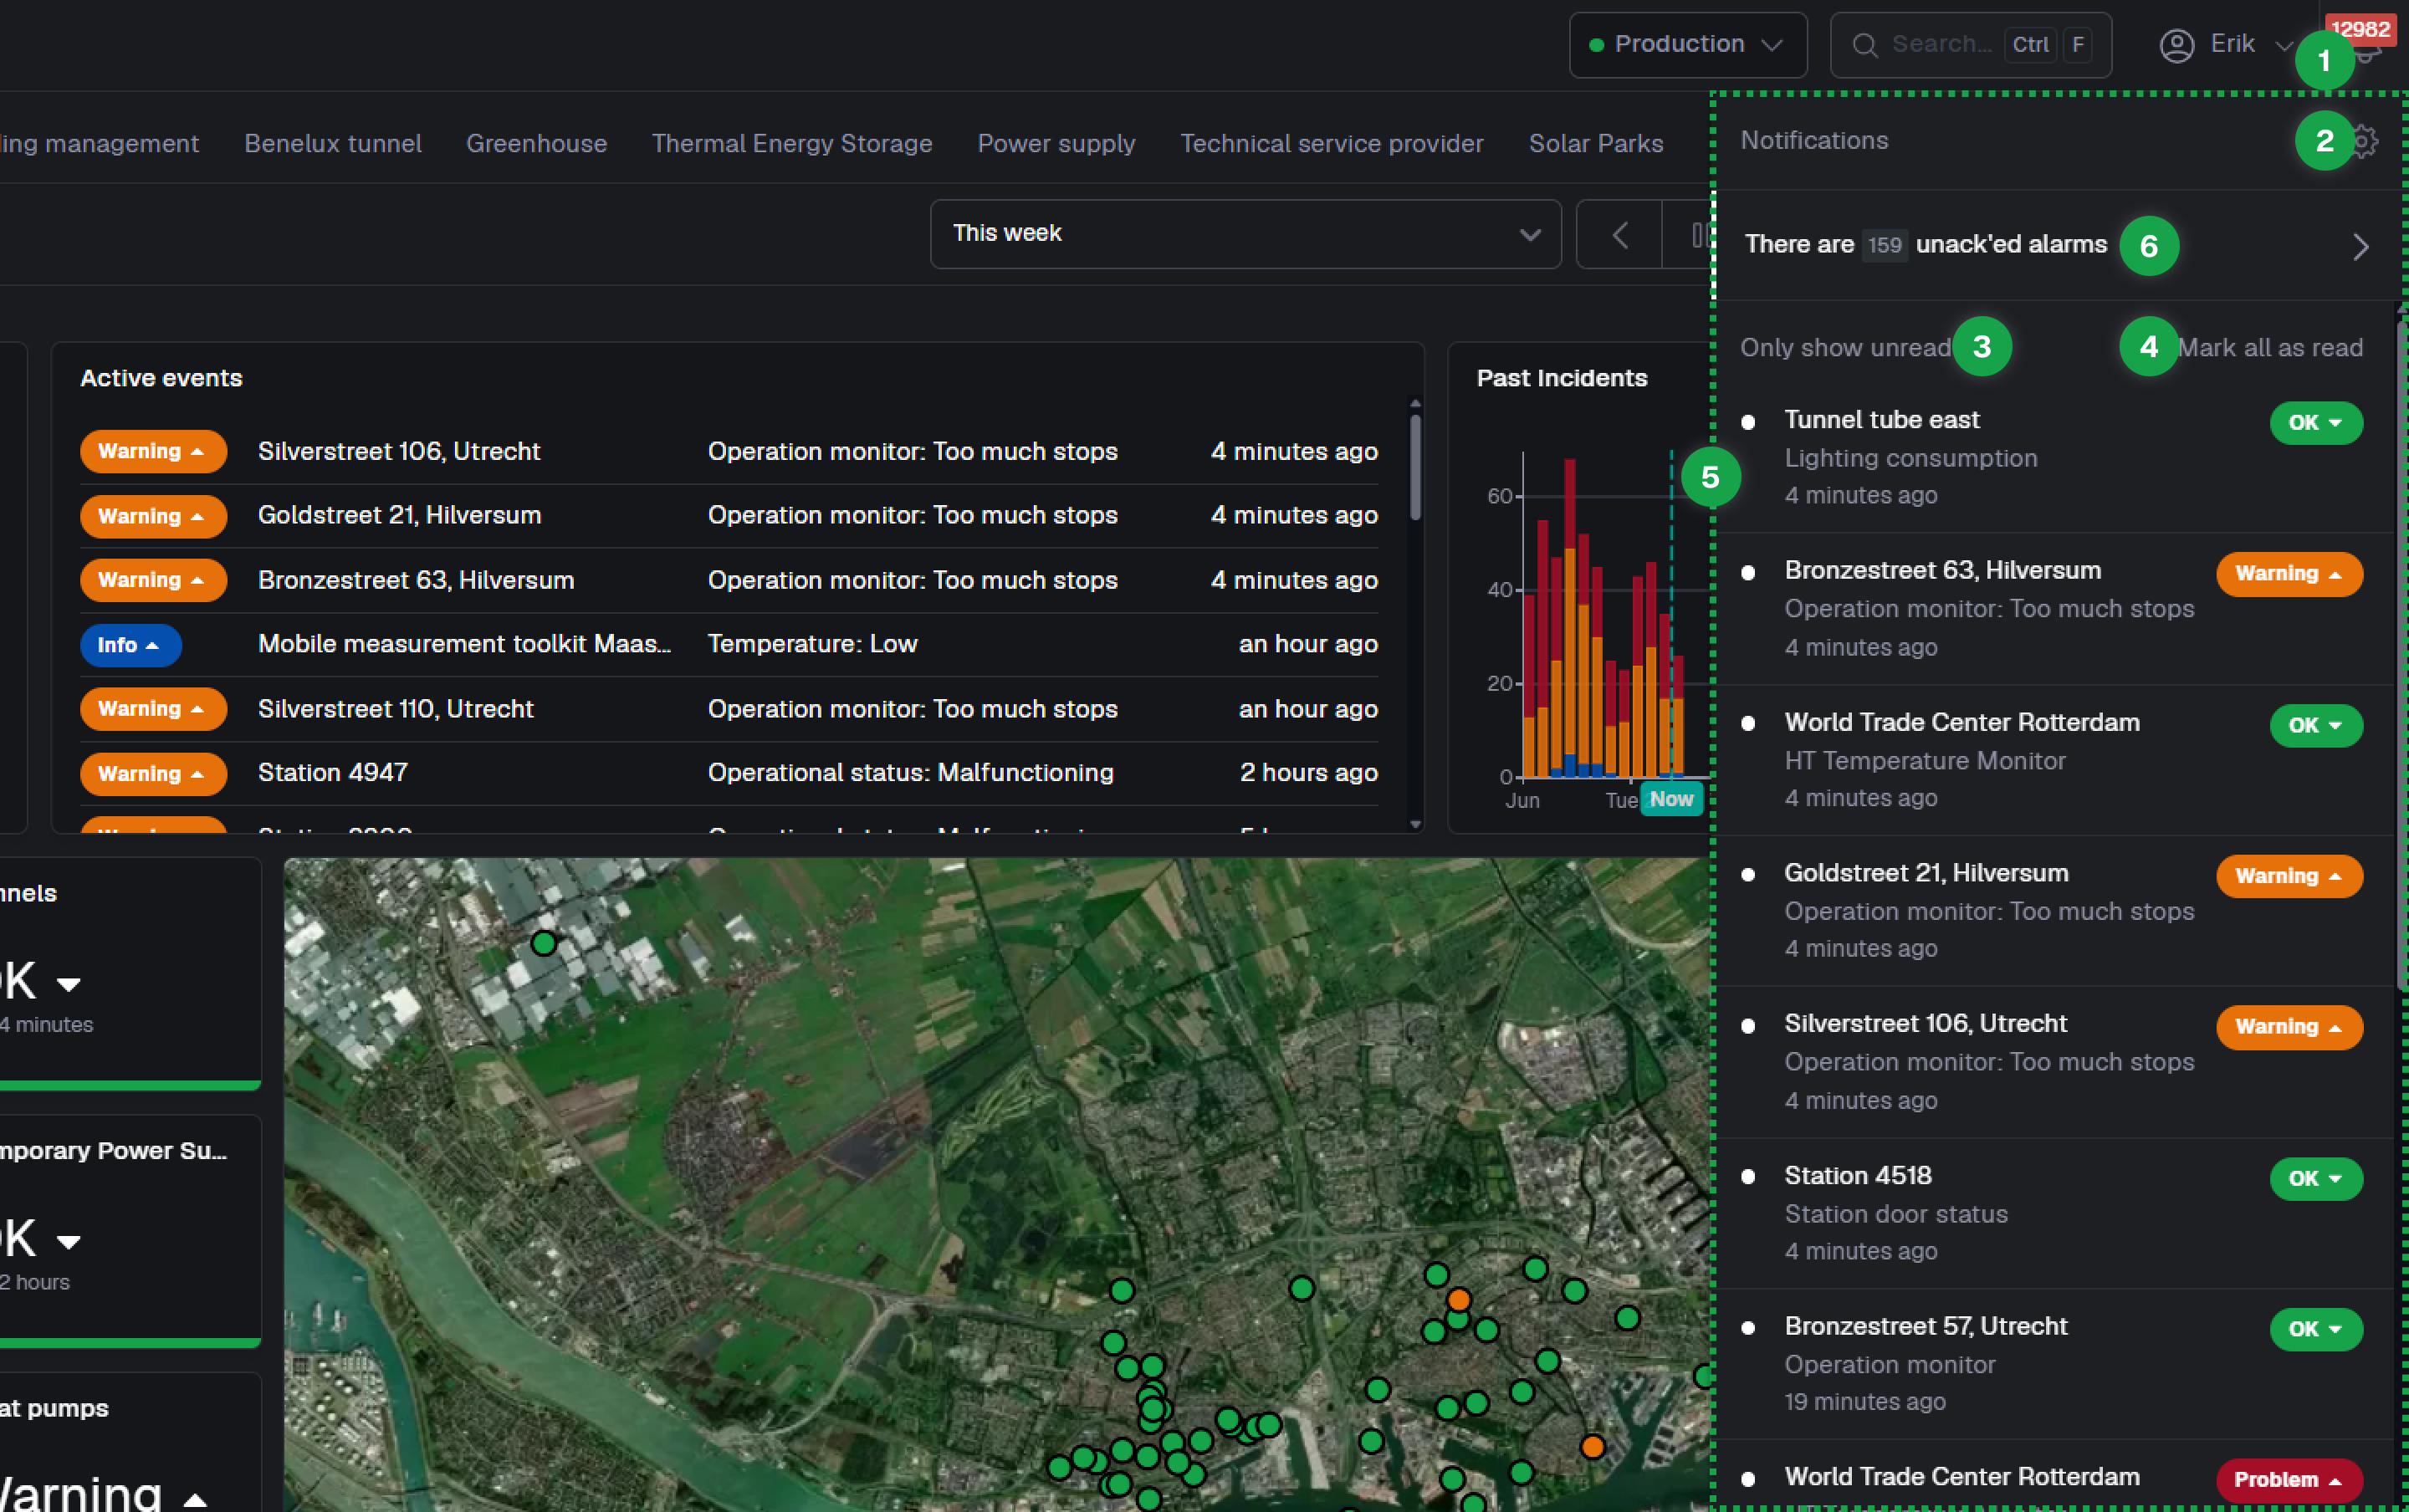
Using notifications
Notifications are used to get updates within the platform, via e-mail or mobile push notifications. The platform notifications are visible by clicking on the bell in the top-right corner of your screen (1). Once opened you can navigate to the notification settings (2), only show the unread notifications (3), mark all your notifications as read (4) or click on a notification to directly navigate to the event (5). You can also click on the unacknowledged alarms banner to go directly to the alarms overview (6).
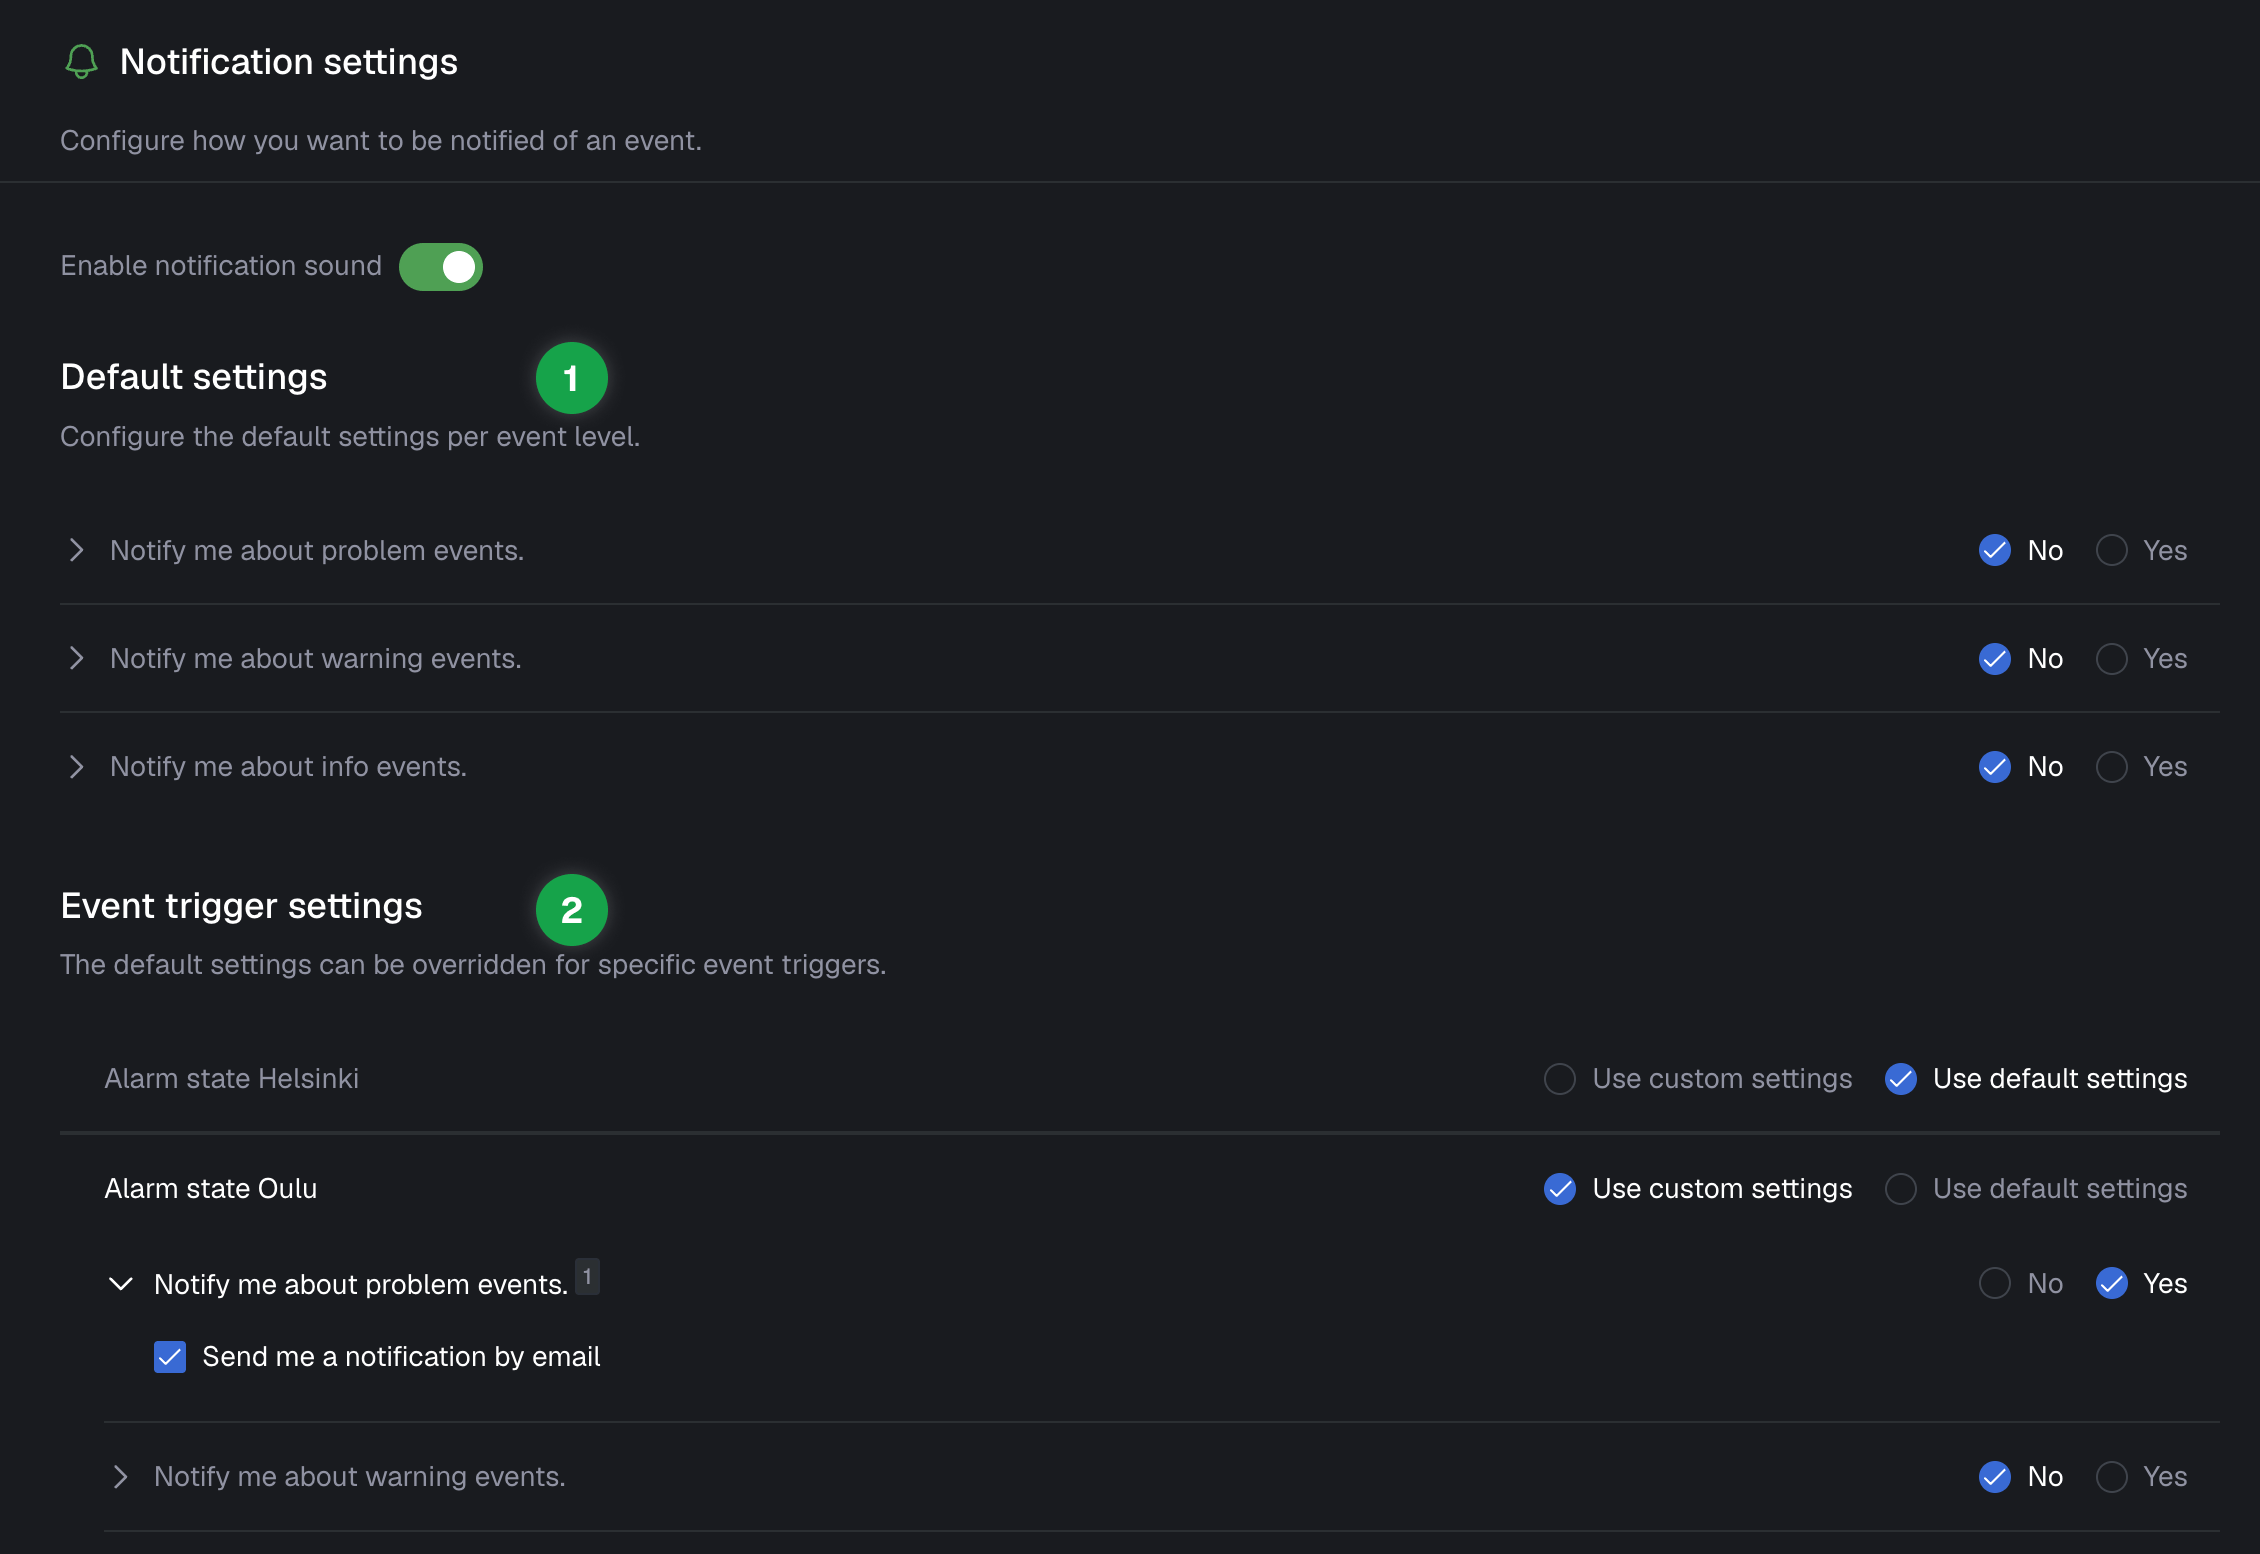
Configuring notifications
The default settings can be applied level-wide (1). For example, you can quickly enable notifications for all Problem events or start to receive weekly-digests. If needed, you can overwrite the default settings by using custom settings per metric per event level (2). Optionally, you can also receive notifications via e-mail or mobile push notifications.
Notifications are sent when entering or leaving the selected level. If you are subscribed to problem events, you will get notified when a problem event is raised, but also when the subject goes from problem to OK. In the presence of suppressions, you will also get notified when a problem becomes suppressed, or is no longer suppressed. For example, you will get a notification if a suppression ends and the subject is still in problem. In this way, you will never miss important events.
Suppressing events
Events can have a number of follow-up actions:
- A notification can be sent (see above)
- A webhook can be called (see webhooks)
- An alarm can be created (see alarms)
Sometimes you do not want those effects to take place, for example, when maintenance is being performed on a number of assets. In that case, you can create a suppression. Suppressions have the following attributes:
| Attribute | Description |
|---|---|
| Name | The name of the suppression |
| Description | A longer description of the suppression, e.g. to explain why it was created |
| Start date | When should the suppression start taking effect. This is optional. |
| End date | When should the suppression stop suppressing the effects of events. This is optional. |
| Subjects | Specifies which subjects this suppression applies to. You can suppress whole groups of subjects by property, type or composition. |
| Event triggers | Specifies which event triggers this suppression applies to. |
In the period between start and end date, the suppression will prevent follow-up actions for the given subjects and triggers. A suppression is evaluated as part of event trigger evaluation, for example when new measurements arrive. Because each evaluation applies to a specific point in time, a suppressed or unsuppressed event is created when the suppression state changes at that time.
Note that suppressed events are not taken into account when determining the status of a subject. In addition, suppressed events are hidden everywhere by default. The only places where suppressed events can be seen is in notifications and in the Events overview when explicitly included. Suppressed events have a diagonally striped pattern on their badges so you can quickly tell them apart from regular ones.