Documentation

Project settings

Aside from the specific settings for subjects and metrics there are also general project settings. These settings can be found under the general section in the settings menu. On this page you can find what the settings are about.

General

The general settings apply for each and every person in the project. So, changing the Theme will result in a Dark or Light theme for everyone. This is what you can set:

Field Description
Name The name of the project so you can easily find it among your list of projects.
Timezone The timezone of the project. Be aware that dates are always displayed in the timezone of the project which might differ from the timezone of your computer.
Description (optional) You can add a description to tell (new) project members what your project is about.
Theme You can choose a Dark or Light theme, cool right?

SSO settings

This setting is only available once SSO is configured at your organization’s SSO settings. For first time users, a default role can be defined to determine the level of access these users are granted.

Leave project

You can remove yourself as a member of the project. Be aware of the fact that you will lose access to the project right after you’ve hit the button ‘Leave project.’ If you want back in, you will need someone else to invite you to the project.

Change owner

This action can only be executed by the Owner of the project. As an owner of the project, you can transfer the project to someone else within the project. Especially useful when want to give someone else responsibility for the project when you are on a holiday or a well-deserved sabbatical of 3 months.

Remove project

This action can only be executed by the Owner of the project. As an owner of the project, you can remove the project and all its resources. This is a dangerous action, so be very, very, very careful with this action.

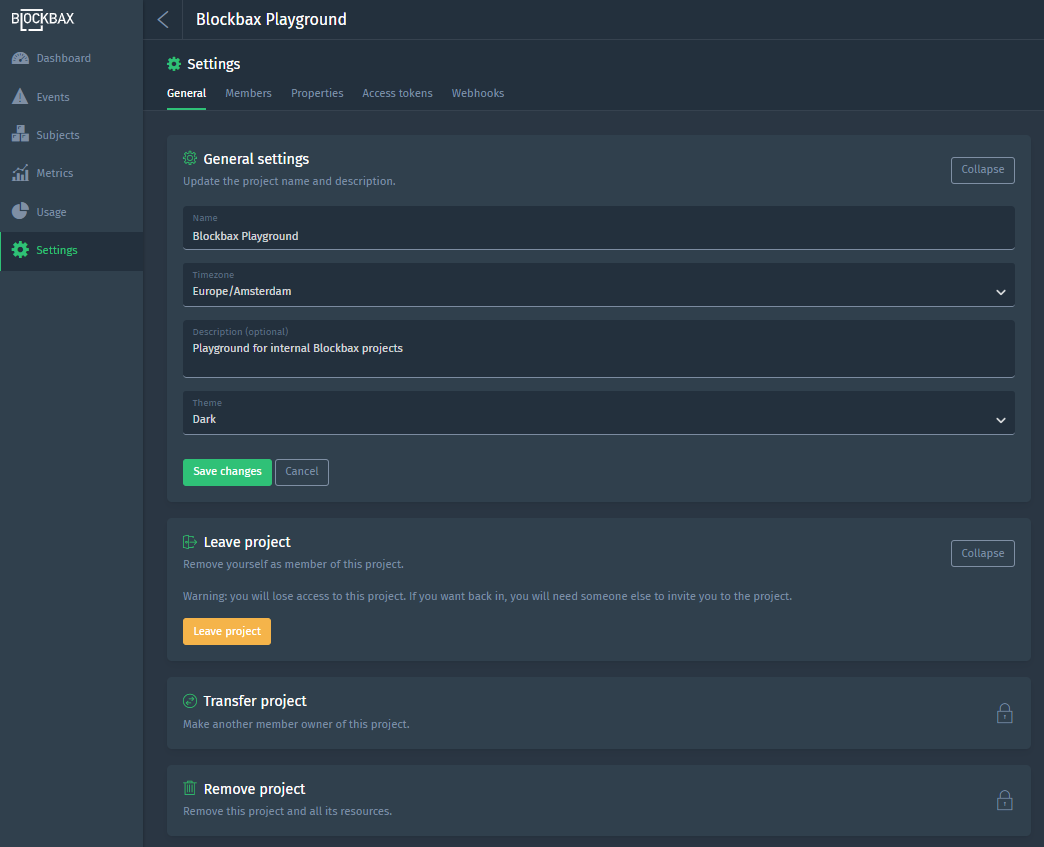
Here is an example of the General settings of the Blockbax Playground project:

Project settings

Roles

Roles give control on what kind of access you grant to the members of your project. From default roles to fine-grained custom roles, it’s all configurable at the project settings.

Default roles

Each project comes with default roles with fixed permissions. The permissions for these roles are the ones we see most often.

Role Permissions
Owner Full access
Administrator Full access but no possibility to remove a project or transfer ownership
Expert Read-only, with write access to event triggers and notification settings. No access to project settings and usage
Observer Read-only, with only write access to own notification settings. No access to project settings and usage

Custom roles

Custom user roles can be used to define more fine-grained permissions for your members compared to the default roles.

Configurable permissions
Resource Permission Filter(s)
Dashboards View, Edit, Manage All or include certain dashboards
Event triggers View, Edit, Manage All or include certain event triggers
Properties View, Edit All or include certain properties
Subjects View, Edit, Manage All, include and/or exclude certain subjects
View, edit and manage

The platform provides three permission levels.

Level Permission
View The resource is only viewable (read-only) for this role
Edit The resource is viewable and editable (write access) for this role
Manage The resource is viewable, editable, creatable and removable for this role
Important to keep in mind:
  • On a dashboard the resource access to event triggers, properties and subjects is still applied. Consequently providing just dashboard permission has no effect when the user has no permissions to the underlying resources.
  • To edit a resource you need to have at least view permissions to the other resources used. For example in order to edit an event trigger you need to have at least view permissions to the subjects in scope and/or properties used.
  • Editing subjects applies only to its properties where the user has edit permissions to.
Include and exclude subject permissions based on properties

The behavior of including and excluding subjects based on a property differs from selecting individual subjects.

Filter type Result
Include The user gets access to the subjects that match all properties
Exclude The user gets no access to the subject that matches one of the properties
Non-configurable permissions

Some resource permissions underlying certain sections in the interface are not configurable, but are derived or only accessible via system-defined roles.

Section Permission Explanation
Subject types Derived All subject types are viewable that are related to the subjects you have access to
Events Derived Events are visible for the subject(s) and event trigger(s) you have access to
Notifications Derived Notifications are constrained to the subject(s) and event trigger(s) you have access to
Explorer Derived You can always use the Explorer for the resources you have permission to
Usage Owner and admin only The default owner and admin role have permission to this section
Project settings Owner and admin only The default owner and admin role have permission to this section

Here you see a Blockbaxer creating a custom role.

Creating custom role

Members

Member management empowers you to keep an eye on the people and their permission in your project. At this part of the platform you can easily invite new people for your project, change roles for your project members and remove an account from the project.

The owner of a project can create an invite link in the members section. This makes it easy to invite people to the project without knowing and typing in their email-addresses.

People that use the invite link to join the project will automatically get the observer role.

The invite link can be revoked by the owner. The invite link is invalid after revoking and can not be used anymore. The owner can always create a new one, but never activate an old one again.

Properties

Properties can be used to label subjects. This is what you need to configure when adding or editing a property:

Attribute Description
Name Give the property a descriptive name so you can easily recognize and find it.
Data type Choose whether the value of the property is of type text, image, number, location, map layer or area.
Values Provide pre-defined values or let project members come up with values they want.
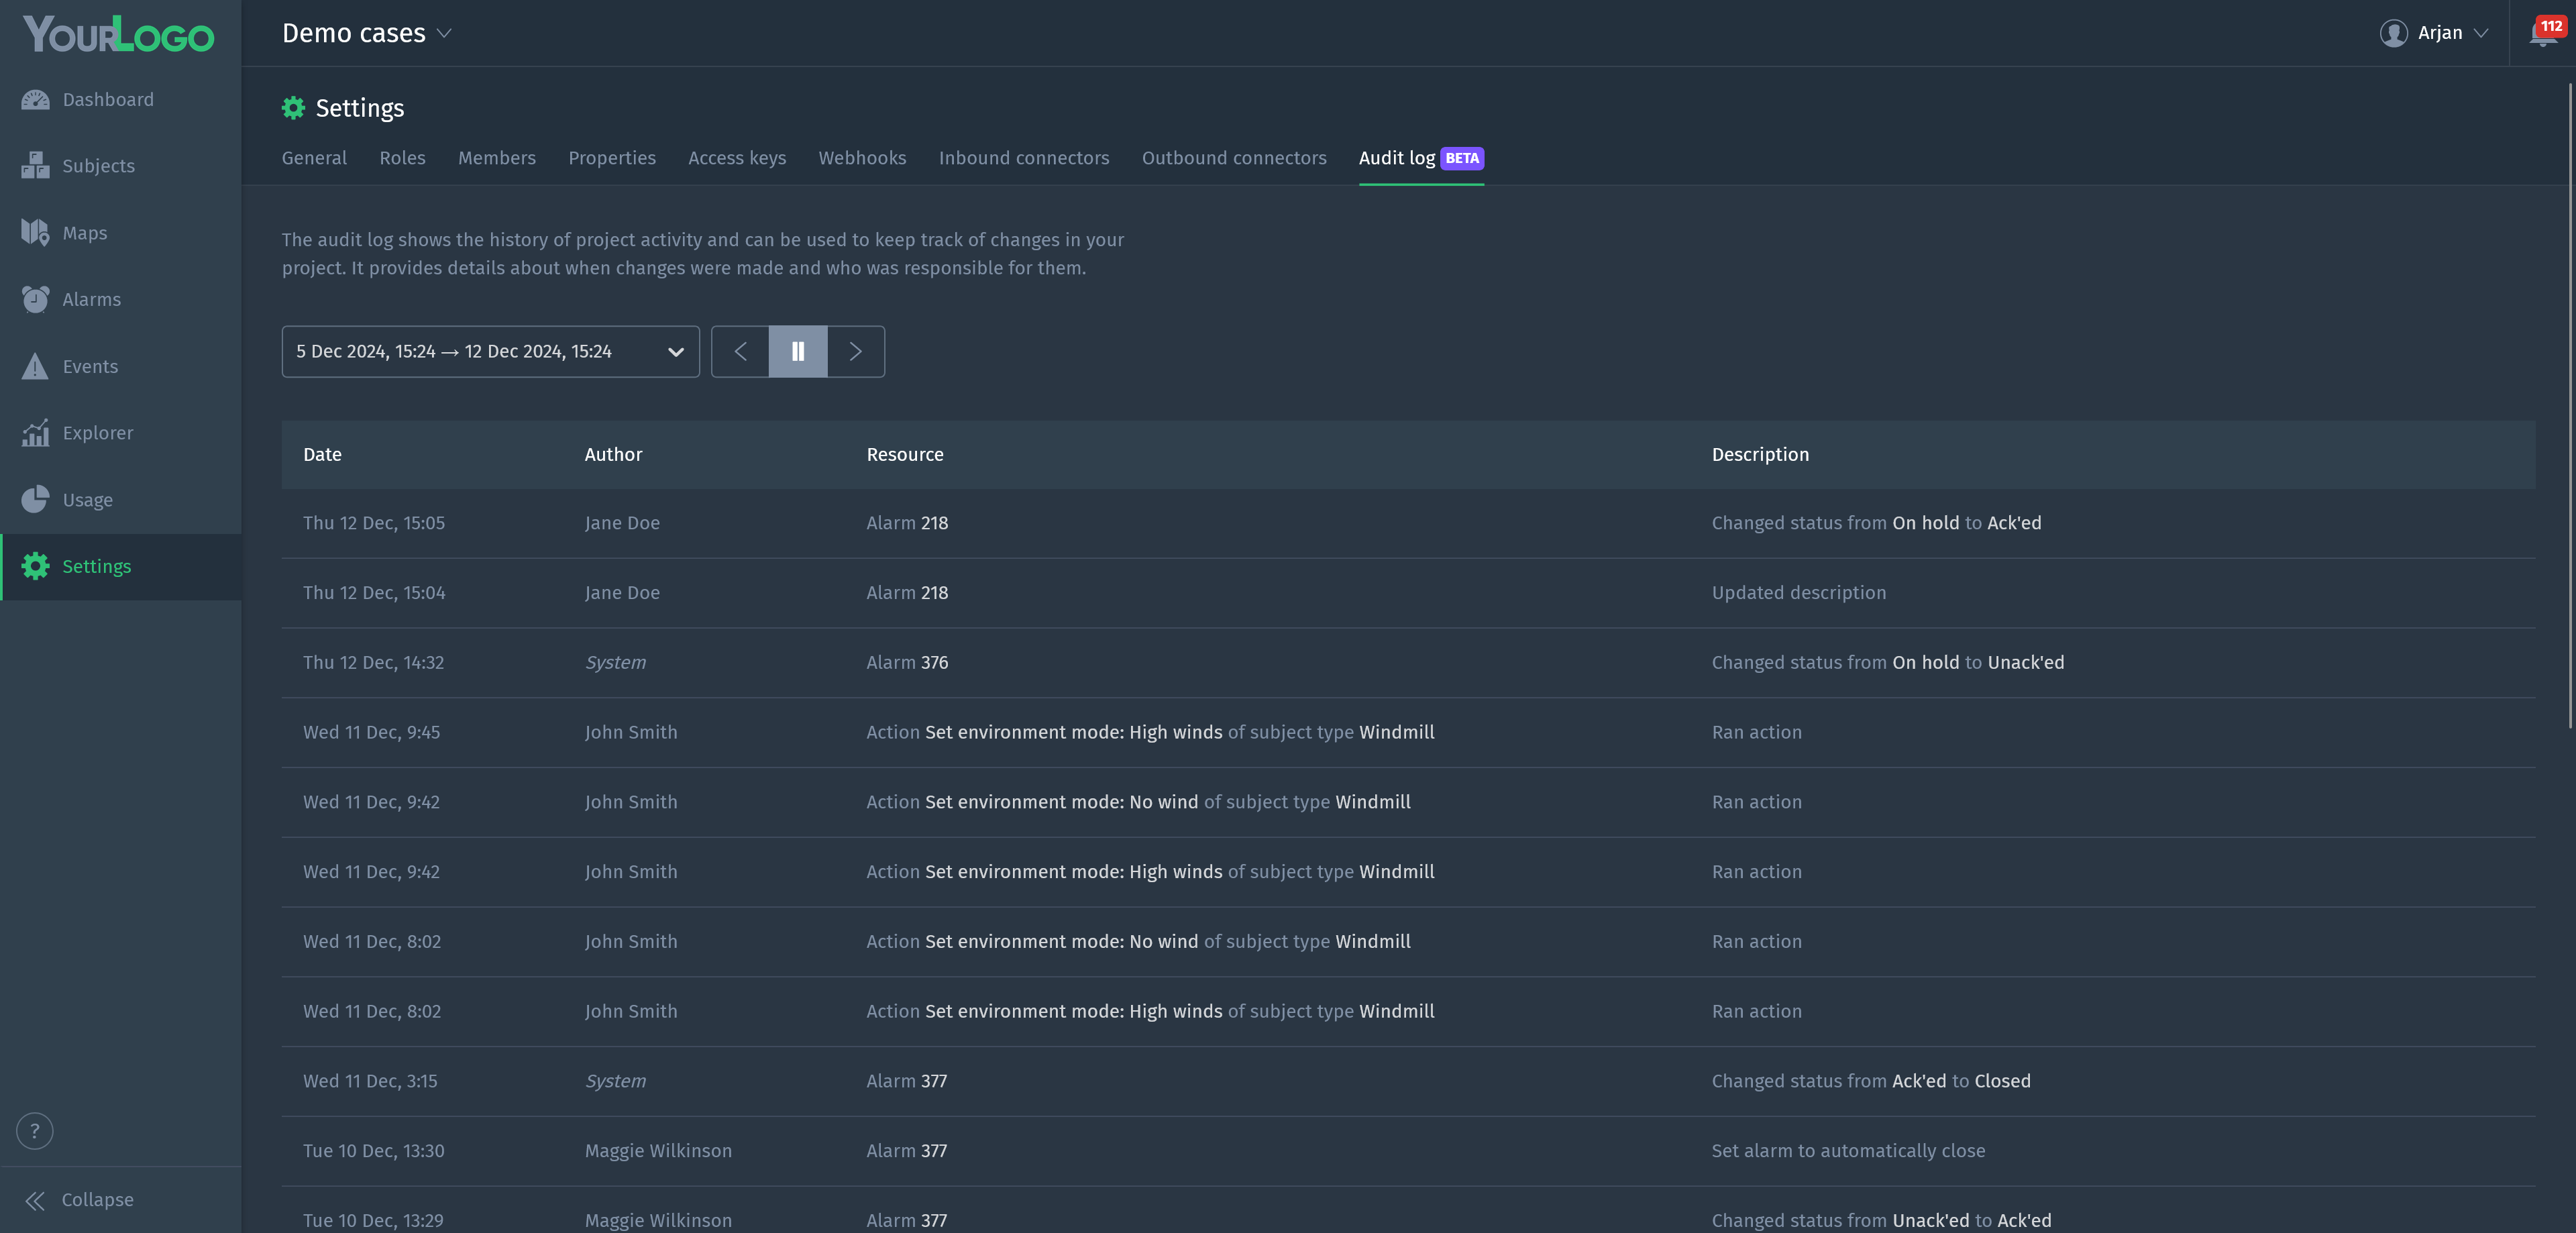
Access keys

Access keys are needed to authenticate with our APIs. You can easily create one by giving the key a descriptive name to easily recognize and find it. Next, you can set the permission to constrain the person or system on what it can do with your data. Once created, you have to copy the key information and use it straight away, because you won’t be able to see it again.

Permissions Description
Full access Full access, the key can be used to read and write all data
Measurement writer Partly access, the key can be used to write new measurements.
Read only Read-only, the key can be used to read the data.

Like the members permissions, it is possible to specify the subjects where the Measurement writer and Read-only key have access to.

Here you see a Blockbaxer creating an access key with specific subject permissions.

Creating access key

Webhooks

Webhooks are developed to send events to other systems in real-time. You can see it as a reversed API: provide your endpoint and the platform makes sure you get the events you are interested in once they occur. The following information needs to be present to make use of the webhook.

General information

Field Description
State Active or Inactive
Name A descriptive name to recognize and find your webhook
Endpoint The URL where the platform needs to POST the events to.
Authorization header Provide an optional header to authorize the webhook for your external system

Event levels

Here you can select the event levels for which the webhook should be called. For example, you might only want to see Problem and Warning events being send to your external system.

Event triggers

Here you have some filter options to only have the webhook called for certain event triggers.

Subjects

Here you have some filter options to only have the webhook called for certain subjects.

The structure of the JSON message that is sent to the endpoint and more details can be found in the integrations section of the docs.

Configuring webhooks

Inbound connectors

Inbound connectors are the integrations to ingest measurements into the Blockbax Platform. You can find the configuration and logs of your project’s default connectors here and you can create custom connectors. This is very useful when either the ingestion method or payload format is different from the standard HTTP, MQTT or CoAP connectors.

General information

Field Description
State Active or Inactive
Name A descriptive name to recognize and find your inbound connector
Protocol Means of sending or fetching measurement payloads.
Auto-create subjects Automatically creates a subjects based on the incoming payload
Protocol

Protocols are divided in two categories: data that gets sent to Blockbax (push) and data that Blockbax fetches from an external server (pull).

The following push-based protocols are available:

HTTP POST

Convert payloads sent to: https://api.blockbax.com/v1/projects/<PROJECT_ID>/measurements?inboundConnectorId=<INBOUND_CONNECTOR_ID>. Further details about integrating over HTTP can be found here.

MQTT publish

Convert payloads sent to topic: v1/projects/<YOUR_PROJECT_ID>/inboundConnectors/<INBOUND_CONNECTOR_ID>/measurements. Further details about integrating over MQTT can be found here.

CoAP POST

Convert payloads sent to: coaps://coap.blockbax.com/v0/projects/<PROJECT_ID>/measurements?apiKey=<API_KEY>&inboundConnectorId=<INBOUND_CONNECTOR_ID>. Further details about integrating over CoAP can be found here.

The following pull-based protocols are available:

MQTT subscribe

Convert payloads that will be retrieved from an external MQTT broker, the following configuration options are available:

Field Description
Broker host The broker host to connect to, e.g. mqtt.example.com
Broker port The broker port to connect to
Topic The topic to subscribe to, e.g. room/+/temperature/+
Client ID The client ID the client will connect with
Username The username that the client will connect with
Password The password that the client will connect with
Kafka consume

Convert payloads that will be retrieved from an external Kafka broker, the following configuration options are available:

Field Description
Bootstrap servers A comma seperated list of the bootstrap servers, e.g. my-bootstrapserver-1.com:9026,my-bootstrapserver-2.com:9026
Topic The topic that the inbound connector will consume from
Consumer group ID The consumer group ID that the client will use
Authentication Authentication method to use, SASL/PLAIN and SSL are supported (this translates to the SASL_SSL and SSL value for the security.protocol Kafka client setting)

Configuration options when authenticating using SASL/PLAIN:

Field Description
Username The username that the client will connect with
Password The password that the client will connect with

Configuration options when authenticating using SSL:

Field Description
Client certificate The client certificate that the client will use to connect with (has to be in the pfx format)
Trust store certificate chain The server certificate that will have to be trusted by the client (has to be in the pem format)
Azure Event Hub consume

Convert payloads that will be retrieved from an external Kafka broker, the following configuration options are available:

Field Description
Namespace The prefix of the Azure Event Hub Namespace, e.g. my-namespace
Topic The topic that the inbound connector will consume from
Consumer group ID The consumer group ID that the client will use
Shared access key name The name of the access key that the client will connect with
Shared access key The access key that the client will connect with
AWS Kinesis consume

Convert payloads that will be retrieved from an external Kafka broker, the following configuration options are available:

Field Description
Region The AWS region where the Kinesis stream is located
Stream name The name of the stream
Consumer group ID The consumer group ID that the client will use
Access key ID The ID of the access key that the client will connect with
Secret access key The secret of the corresponding access key
Auto-create subjects

To map measurements to subjects and metrics you can specify your own IDs. We call these ingestion IDs, by default these are derived from the subjects’ external IDs and metrics’ external IDs (e.g. MyCar$Location) but you can also override these with custom ones. When you use this option a subject is created if its external ID derived from the first part before the $ sign of the ingestion ID does not exist (i.e. for the ingestion ID MyCar$Location a subject with external ID MyCar will be created if the metric with external ID Location can be linked to exactly one subject type).

Payload conversion

In addition to a protocol an inbound connector requires specifying a payload conversion. The payload conversion is a script that is used to transform an arbitrary received payload to measurements that are ingested in the Blockbax Platform. A payload conversion has an expected payload format and is defined as a plain JavaScript function.

Field Description
Payload Format The type of payload format that is sent to Blockbax. The received payload bytes are decoded based on the specified format.
Script A JavaScript (ECMAScript 2022 compliant) function with signature convertPayload(payload, context) { ... } is used to convert the payload to measurements
Payload formats

Currently, four different payload formats are supported by Inbound Connectors. Payloads must always be sent to the inbound connector as bytes, but the format specifies how these bytes are decoded and passed to the payload conversion function.

Payload Format Description Passed to convertPayload as
JSON Received payload is decoded as UTF-8 JSON string JavaScript Object
CBOR Received payload is decoded following the CBOR specification JavaScript Object
String Received payload is decoded as UTF-8 String JavaScript String
Bytes Received payload is passed as received JavaScript ArrayBuffer
Avro Received payload is decoded according the the schema in the specified schema registry. This is exclusive to the Kafka consume connector JavaScript Object
Payload conversion script

The payload conversion script is a user-defined script that is used to transform the decoded payload to measurements that are to be ingested by the Blockbax Platform. Additionally, log messages can be generated to provide feedback to the user from the payload conversion script.

The payload conversion is defined as a JavaScript (ECMAScript 2022 compliant) function with required signature convertPayload(payload, context) { ... }. The web client provides a convenient editor with auto-completion and method signatures on hover. An example script is shown below:

function convertPayload(payload, context) {
    const ingestionIdPrefix = payload.id + "$";
    const timestamp = date(payload.timestamp);
    for (const [key, value] of Object.entries(payload.data)) {
        context.addMeasurement(ingestionIdPrefix + key, value, timestamp);
    }
}
Payload Conversion

This script takes a JSON type payload and uses a top level property for prefixing the ingestion ids. The timestamp for all measurements contained by the payload is parsed from the top level object as well. The script then iterates over all key value pairs in the data field to ingest them as measurements.

Payload parameter

The payload parameter is the decoded payload sent to the inbound connector. This parameter can be either a JavaScript object, a string or an ArrayBuffer. The type of the payload depends on the specified payload format. The payload object is immutable and will throw a TypeError on modification.

Context parameter

The context parameter is an object used to pass measurements and logs to the Blockbax Platform. The context parameter cannot be modified. Its functionalities are described below:

addMeasurement(ingestionId, value, date)

Rounds decimal numbers down to the closest integer value.

Parameter Description
ingestionId Ingestion ID of the target series for the measurement.
value Either a number, string or a location object ({"lat": <number>, "lon": <number>, "alt": <number>}). Note that the alt field of the location object is optional. You can use the location(lat, lon, alt?) library function to create a location object.
date (optional) Date object with the date of the measurement. You can use the date(input, format?) library function to create a date object from various input formats.
logInfo(msg)

Logs a user message at INFO level.

Parameter Description
msg A string representing the message to be logged.
logWarn(msg)

Logs a user message at WARN level.

Parameter Description
msg A string representing the message to be logged.
logError(msg)

Logs a user message at ERROR level.

Parameter Description
msg A string representing the message to be logged.

Optionally when the MQTT subscribe connector is selected, it will also have the following functionality:

getTopic()

Returns the topic on which the payload was received. E.g. when subscribed to topic temperature/#, the function could return temperature/room-1/device-1.

Library functions

Several library functions are available when writing your conversion function to make writing a conversion easier and more concise. The available functions are described below.

number(value)

Parses provided input string value to a JavaScript number and rounds it to 8 decimal places if needed.

Parameter Description
value A string value containing a number.
location(lat, lon, alt?)

Creates a location object from the provided latitude, longitude and optionally altitude.

Parameter Description
lat Number value representing the latitude of the location in degrees.
lon Number value representing the longitude of the location in degrees.
alt (optional) Number value representing the altitude of the location above the earth surface in meters.
date(value, format?)

Attempts to parse the provided value to a JavaScript date object. If a date format string is provided it will use the date format string.

Parameter Description
value If no format is specified: An input value containing a Unix timestamp in milliseconds or seconds since Epoch, or an ISO8601 string. If a format is specified: a date string that matches the provided date format string.
format (optional) A date format string, or an array of date format strings if multiple formats could apply.

Without a format specified this function accepts by default:

  • Unix timestamps in milliseconds (13 digit number, since epoch 1 January 1970 00:00 UTC)
  • Unix timestamps in seconds (10 digit number, since epoch 1 January 1970 00:00 UTC)
  • ISO8601 strings

For the date format the following parsing tokens are supported:

Input Example Description
YY 01 Two-digit year
YYYY 2001 Four-digit year
M 1-12 Month, beginning at 1
MM 01-12 Month, 2-digits
MMM Jan-Dec The abbreviated month name
MMMM January-December The full month name
D 1-31 Day of month
DD 01-31 Day of month, 2-digits
H 0-23 Hours
HH 00-23 Hours, 2-digits
h 1-12 Hours, 12-hour clock
hh 01-12 Hours, 12-hour clock, 2-digits
m 0-59 Minutes
mm 00-59 Minutes, 2-digits
s 0-59 Seconds
ss 00-59 Seconds, 2-digits
S 0-9 Hundreds of milliseconds, 1-digit
SS 00-99 Tens of milliseconds, 2-digits
SSS 000-999 Milliseconds, 3-digits
Z -05:00 Offset from UTC
ZZ -0500 Compact offset from UTC, 2-digits
A AM PM Post or ante meridiem, upper-case
a am pm Post or ante meridiem, lower-case
Do 1st… 31st Day of Month with ordinal
X 1410715640.579 Unix timestamp
x 1410715640579 Unix ms timestamp
Testing payload conversion scripts

Payload Conversion scripts can be tested in the Blockbax Web Client. Depending on the payload type a test payload can be provided, and the conversion script is then executed for that payload. For the JSON, CBOR, String and Avro types, a string can be provided as payload. For the CBOR and Bytes type, a hex string can be provided. The test payload can be saved with the conversion script. This allows doing basic regression testing when making changes to the script and verifying that the output measurements are correct for that payload. When the conversion script is executed for the payload the web client will show the measurements and logs that were produced by the payload conversion. Please note that this is only a visual representation of the outcome of the payload conversion, no actual measurements are ingested. Any problems with the script or resulting measurements are shown as log messages.

Payload testing

Outbound connectors

Outbound connectors give you the opportunity to stream your data out of the Blockbax platform and into your own infrastructure. You are able to configure two outbound connectors, one for events and the other for measurements. when these are set up, data is forwarded whenever an event is triggered or measurement is received. There are two protocols to choose from: either have your data produced to an Azure Event Hub or to a Kafka cluster.

Kafka produce

Data can be produced into your Kafka cluster. For authentication there are 2 options: SASL/PLAIN (username and password) and SSL (certificates), one of which needs to be supplied. All the settings can be seen below:

Field Description
Bootstrap servers A URL to the desired namespace
Topic The topic you would like to have your data streamed to
Username (SASL/PLAIN) The username belonging to the Kafka user that Blockbax will connect with
Password (SASL/PLAIN) The password belonging to the Kafka user that Blockbax will connect with
Client certificate (SSL) The certificate (pfx format) that contains the client certificate
Truststore certificate chain (SSL) The certificate (pem format) of the certificate that the broker uses
Outbound connector creation

Azure Event Hub produce

The data can be produced to your Azure Event Hub, the connector will need the following settings:

Field Description
Namespace The prefix of your Azure Event Hub namespace
Topic The topic you would like to have your data streamed to
Shared access key name The name of your access key
Shared access key The access key needed for permissions to stream data into your infrastructure
Outbound connector creation