Docs
Milesight gateways
Milesight LoRaWAN gateways are easy to install and setup. With minimal effort you can set up your own LoRaWAN network to connect your devices to. When combining Node-RED with our Node-RED SDK on their gateways to set up a LoRaWAN sensor connected to Blockbax within minutes.
Goal
The goal of this tutorial is to configure a Milesight LoRaWAN Gateway and configure it with both Node-RED and our Node-RED SDK to send data from a LoRaWAN sensor to Blockbax.
Prerequisites
- A Milesight LoRaWAN Gateway
- A LoRaWAN sensor
For this tutorial we selected the gateway UG65 LoRaWAN gateway and sensors EM300, WS301 and WS101 from Milesight (checkout our Milesight sensors tutorial).
Initial setup
Milesight provides datasheets, quick guides and user guides for their Gateways on their website. We suggest that you follow the quick guide to set up the hardware.
If done correctly you will have set up your own LoRaWAN network.
Adding devices
After setting up your own LoRaWAN network you will need to connect devices to your gateway.
First you will need to know the Device EUI and the Application Key from your LoRaWAN enabled device.
To add a device to the Milesight gateway you will need to define an application and a profile first. The application is a collection of devices with the same purpose and a profile defines the devices capabilities.
To configure an application do the following:
- Goto and login to the Milesight Web GUI.
- Go to “Network Server” -> “Applications”.
- Press the ‘+’ button.
- Name the application and save.
To configure a profile do the following:
- Goto and login to the Milesight Web GUI.
- Go to “Network Server” -> “Profiles”.
- Press the ‘+’ button.
- Name the profile and save.
To add the device do the following:
- Goto and login to the Milesight Web GUI.
- Go to “Network Server” -> “Device”.
- Press the ‘Add’ button.
- Fill in the Device EUI and Application Key
- Select the Application and Device-Profile
- Name the device and save.
If done correctly you will have connected your LoRaWAN device to the Milesight gateway.
Tip:
In some cases you will have to fill in a new Application Key or a default one can already be set up. It's advised to generate new one instead of using the default key. To generate new keys you can use [this tool](https://www.browserling.com/tools/random-hex).
Setting up Node-RED
The Milesight gateways support Node-RED natively. to activate Node-RED do the following:
- Goto and login to the Milesight Web GUI.
- Goto “APP” -> “Node-RED”.
- Check the “Enable” checkbox and press Launch.
The login details are the same as the Web GUI.
Now you will be inside the Node-RED editor where you can use the LoRa nodes together with our Node-RED SDK.
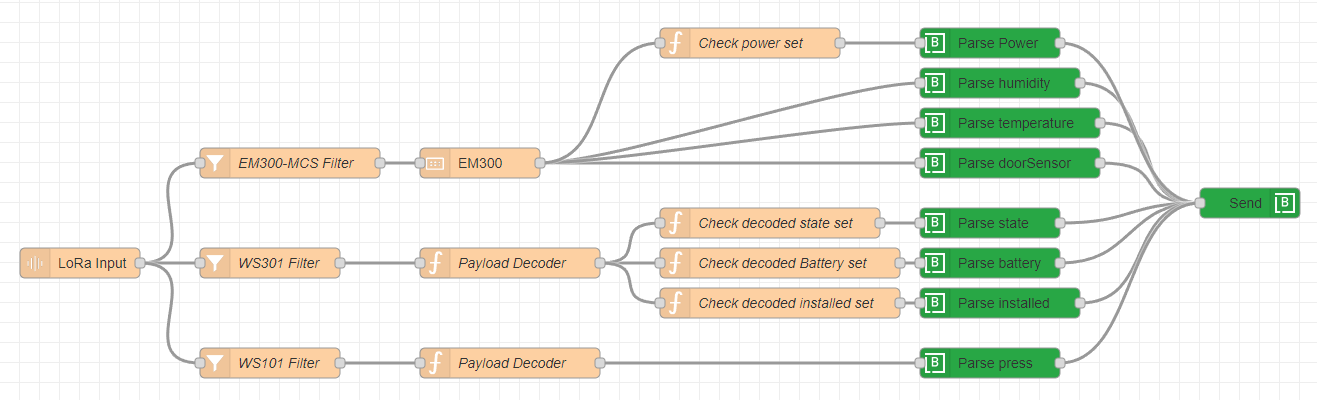
Decoding payloads
Milesight does not support every LoRaWAN sensor type, for other sensors (for example the magnetic contact switch WS301) a custom decoder needs to be created. A quick way to do this is to use the decoders on their Milesight GitHub page. For example this decoder can be used to decode the magnetic contact switch WS301 payload.
These decoders are originally meant to be used as decoders on LoRaWAN networks like The Things Network or Chirpstack. If you want to decode the payload in Node-RED you will first need to decode the payload like so:
| |
This code can be used in a Node-RED function node in combination with a decoder from the Milesight GitHub page.