May 9, 2019 · 10 min read
Hands on with IoT, edge computing and cloud computing
From edge to cloud
Last blog we talked about edge computing and cloud computing and how we could use IoT networks to combine their benefits. In this blog I will show you how I connected sensors to a Raspberry Pi (our edge device) and send its sensor data to the Blockbax Platform (the cloud), so we can get some insightful data and act upon it.
Collecting data
Before I am able to send data to the Blockbax Platform I first have to decide which kind of sensors to use. The best sensors to use with a Raspberry Pi would be sensors that interface with the I²C protocol. This is a popular serial communication protocol used to communicate with sensors or other low level devices.
After some research I found out that the I²C sensors from Adafruit were the best choice. Adafruit provides great tutorials and easy to use libraries that interface with the I²C protocol to read the sensor data.
My shopping list
There are many kind of sensors out there. For this blog I wanted to create an easy to understand setup including sensors that are relatively common and are easy to visualize. With this in mind I decided to measure our very own Blockbax headquarters.
Knowing I wanted to measure the office environment, I selected four potential sensors from the Adafruit list of I²C sensors:
| Sensor | Type of sensor data |
|---|---|
| BME280 | Temperature, humidity and air Pressure |
| TSL2591 | Lux and infrared |
| SGP30 | VOC and eCO2 |
| VEML6070 | UV and light |
I ended up choosing the BME280 and the TSL2591 sensors to start with. Next to the actual sensors, I needed some extra hardware to connect the sensors to the Raspberry Pi. See below the results of my final shopping list.
| Shopping List | Description | |
|---|---|---|
Sensor for Temperature, Humidity and Air Pressure sensing | $19.95 | |
Sensor for Lux and infrared sensing | ||
Raspberry Pi | ||
Raspberry Pi Power Supply | ||
Board with cable to connect pins on Raspberry Pi to a breadboard | ||
Cables to connect headers on the breadboard | ||
Breadboard used to plug cables into |
Connecting sensors to the Raspberry Pi
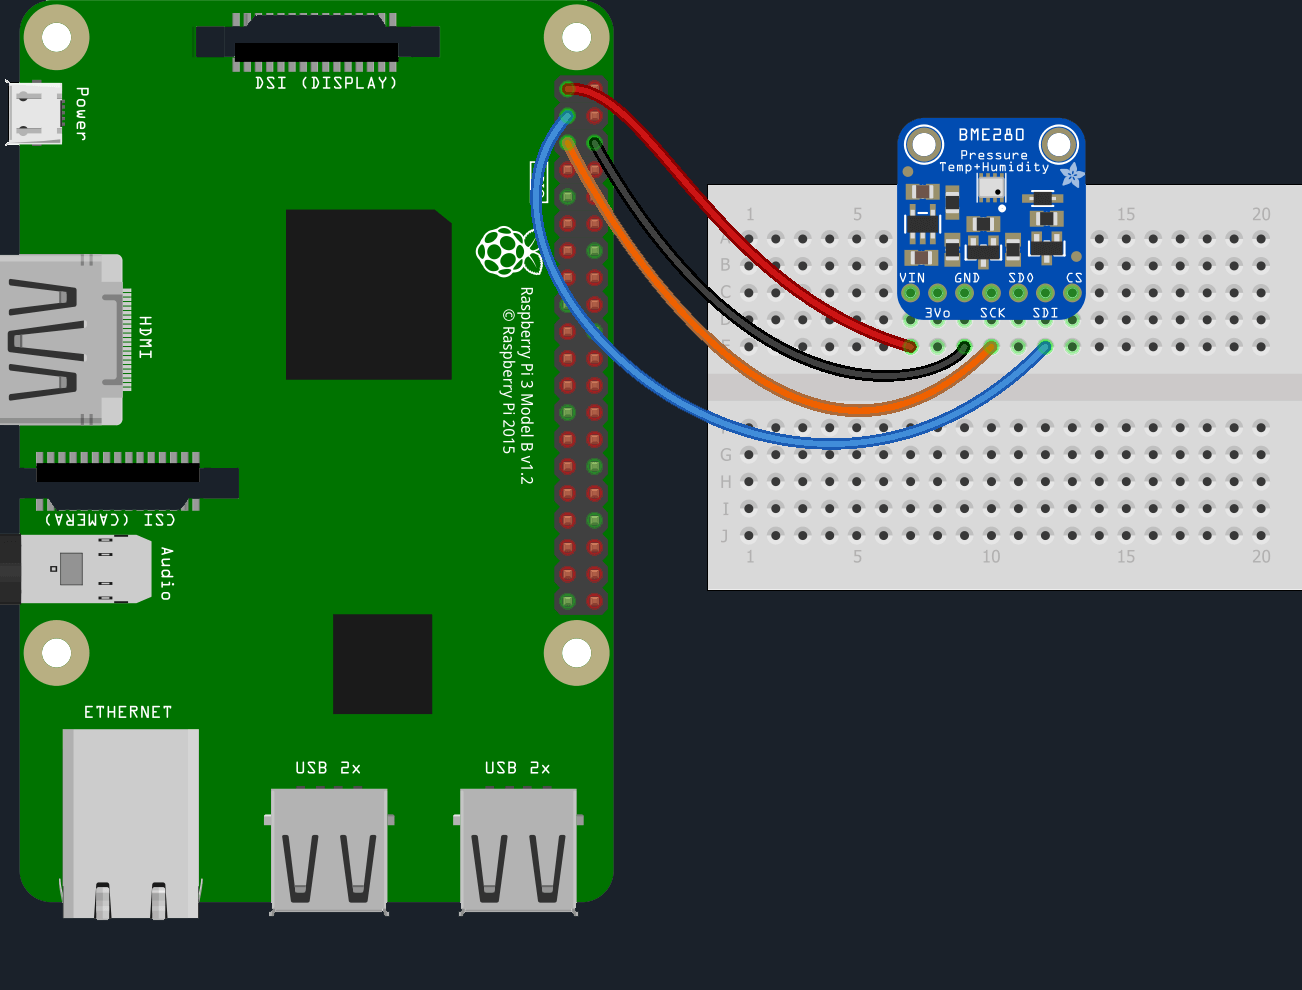
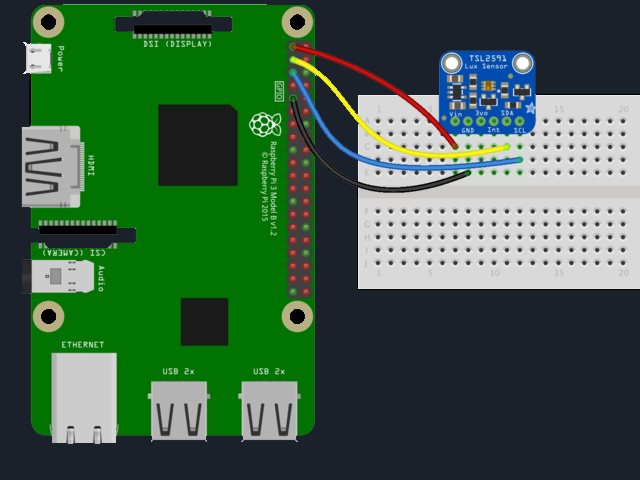
Now that we have decided which sensors we are going to use we need to connect them to the Raspberry Pi. On the Adafruit website we can find great tutorials that show you how to connect these sensors and how to use their libraries. I used this tutorial for the BME280 & this tutorial for the TSL2591.
Using these tutorials the sensors should be connected like this:
And our Python code to access the sensor data from the BME280 and TSL591 should look something like this:
| |
From edge to cloud
Now that we have access to our sensors and their data we can send it to the Blockbax Platform. Blockbax provides a Python agent which makes it really easy to do this with a few lines of configuration and code.
Protocols
Just like how we got data from the sensor to the Raspberry Pi, we need to decide on a protocol we want to use to be able to send our sensor data to the Blockbax Platform. Because MQTT is becoming the industry standard for IoT applications, we will embrace this protocol as our protocol of choice. MQTT is a reliable and lightweight messaging protocol which can be tuned to assure a successful delivery.
Over a secured MQTT connection we can deliver measurements to the Blockbax Platform with sub-second latency relative to the time of the measurement. Within Blockbax we can analyse these measurements in real-time and send out events and notifications instantly. This will be the topic of the next blog in the series.
Setup our data structure within Blockbax
Within the Blockbax Platform, a generic data model is defined which is independent of the use case and implementation details. Important entities are subjects and metrics. Subjects are the entities you want to monitor, in this case that would be ‘Blockbax Headquarters’. Metrics are the properties of a subject you want to measure, in this case an example would be ‘Temperature’.
When sending the data to the Blockbax Platform we have to tell it which sensor data belongs to which subject and which metric. To do this we can configure an ‘External ID’ for both. These IDs we then use to specify to which subject and metric a sensor’s measurements belong.
Connecting sensors to Blockbax
To connect our sensors and map it to the data structure of the Blockbax Platform, we need to write a local configuration file on the Raspberry Pi. After this we have to include a few lines of code to link our sensors to subject and metrics as defined in the Blockbax Platform. In the end the configuration will look something like this:
| |
We also support HTTP batch requests.
| |
This local configuration does four things:
- Configure which protocol we use to send data;
- Identifying our project with a
projectId; - Link the Raspberry Pi as a subject to the
subjectExternalId; - Link functions that return our sensor data to their
metricExternalId’s
Depending on the protocol you use, you can add a few additional configurations.
For configuring the MQTT protocol we only need to define the measurementInterval. This is the time in between each time we measure and send our data.
In case you might prefer to use the HTTP protocol, you have to also define maxTimeBetweenBatches. Batches of measurements are automatically send if the batch size reaches 500 measurements or if the time difference between the last batch surpasses this configured threshold.
All there is left is to create the functions that return our sensor data, import the Blockbax library, declare the Blockbax agent from that library and we are done.
| |
In this Python script we made five functions that return sensor data. These functions have the same names as configured in our configuration file. Because they have the same name the agent is able to figure out which sensor data needs to be linked to which metricExternalId.
Next up
Sensor data is often volatile and the information it contains is perishable, this means the benefits of this data will be lost if the information is not discovered and acted on quickly enough. For this reason it is most valuable when we can convert this data into relevant data as quickly as possible, or even better; to actions that matter to us. In the next blog I will show you how I used the data we connected from our sensors and turn it into valuable actions.


